27/04/2013: Almost May already! This year is going so fast!
02/04/2013: Happy Easter. I hope everyone had a fantastic weekend.
01/01/2013: Happy New Year!!
24/12/2012: Merry Christmas!!
13/11/2012: Getting hand-made presents ready for Christmas!!
Showing posts with label complete projects. Show all posts

Sunday, July 28, 2013

Matryoshka


I am super happy with my own take on the Matryoshka style popular at the moment. It is very hard to make miniature faces that are beautiful and detailed and even harder to find nice faces to buy so I made my own - and you can have them too!

The face I've used is one of 6 designs I've created for Matryoshka faces. The faces I designed range from traditional to Japanese anime inspired and they're printed on 100% cotton. I have them listed in my shop for $2 each or 3 for $5, but at the moment quantities are limited. The best thing about them in my opinion is that I've left the hair unprinted so you can customise them yourself. The face is a 3" in diameter design but I have extended the face background to 3.75" to give you plenty of space to move the face around and so that if you're not quite accurate you won't get any unsightly white showing through.

There are 6 face designs to start with and I have a couple more done up on the computer for the second print run so if you like them there will be more to collect at a later date.

The matryoshka design pictured is also for sale which includes basic instructions for the detachable heart and the head scarf tie, but if you want to make your own you can either buy a blank design as a base or make your own style around a 3" circle. I made mine into a simple bag.

Wednesday, April 3, 2013

Mini Tote


I threw together this project late Monday night. I had the whole long weekend to work on it but instead I procrastinated until 8pm and then stayed up until 1am finishing this. My current bag is wearing through the fabric and because it has a gorgeous chicken on it I don't want to completely ruin it before I see if I can fix it so this is my new replacement bag.

I made it just the right size for me. It is about 10" x 8" with two zipper pockets. The main compartment is big enough for my purse and kindle while the outer zipper pocket fits my phone and the inner zipper is perfect for tucking away a spare shopping bag or small notebook. It fits everything I need to take with me perfectly and I don't have to rummage around in a larger bag anymore.

Monday, December 24, 2012

Santa Sack #2


Phew!! Now I'm really done! It is 11.20PM Christmas Eve and I've finished the second sack. I knew I probably would put it aside and not get this finished until this time next year if I didn't at least do a bit more sewing tonight and since I'd already cut out all the fabric it went together really quickly.

I love these bags with their chickeny cuteness and can't wait to show them off tomorrow. Now I'm off to bed so Father Christmas can drop off my presents. Merry Christmas everyone!!


Sunday, December 23, 2012

Santa Sack


This is my last project before Christmas I think. I was going to make two of these, but it has been so hot today that just making one took 4 hours and it is tiring in front of my hot sewing machine. I have the second cut out so maybe if it cools down later tonight I'll get it out and finish it off.

I got these Christmas panels last year in the after Christmas sales. There are two of the tree that you see here and two which are more lime green with three chicks on gifts. I ignored the instructions provided and used some quilt batting to give the bag more substance and lightly quilted around the tree and border. Then I added handles and a bright red lining. Luckily I had heaps of bright red cotton for some reason and this project has used up nearly all of it.

Now I'm off to wrap presents under the air conditioning to fill my new sack!! Merry Christmas everyone!!


Wednesday, December 12, 2012

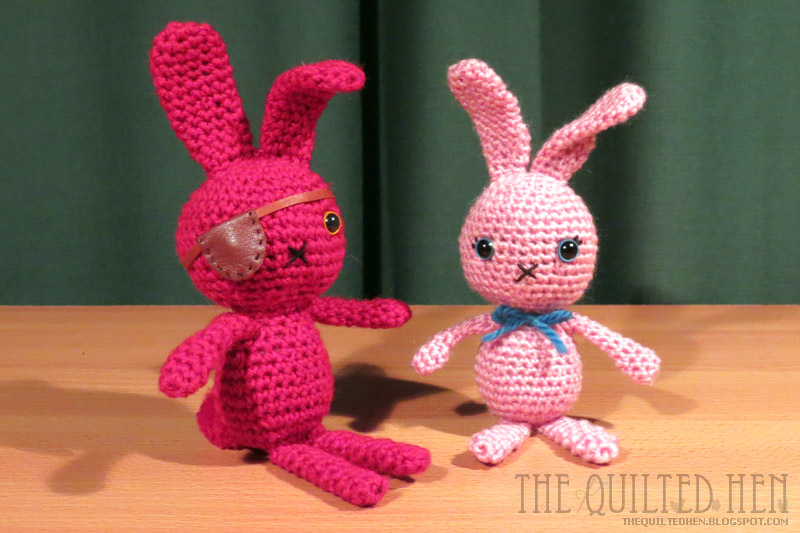
Two Crochet Bunnies!


I finished the pink bunny last night. This time it only took me two evenings of work to finish the bunny but I don't know if my tension was tighter, my wool was a different weight, or I didn't follow the pattern correctly on one of the bunnies... because the pink one is smaller! That is ok though because it is going to a little girl and the red one is going to her older brother.

To finish them off I added a blue wool bow for the pink one which is stitched down so hopefully it won't come undone. The red bunny got a leather eye patch to turn him into a tough pirate! yarr!!

If you want to make one yourself see this post for a link to the instructions.


Saturday, November 24, 2012

Dog Kerchiefs


I've been distracted from other projects because of a variety of reasons. First up I actually cleaned up my sewing area and put a lot of things away!! I'd accumulated lots of materials which I'd pulled out to contemplate and never put away though projects  I have planned hadn't started, so the last week has been mostly dedicated to putting away and finding new homes for things. I also tried to tackle the back room/junk room. It now looks worse, but it is on its way to being better. This weekend I need to spend some more time in there!

Second, I made another tote bag, like the green one, but in blues to match the cat pouch. A handmade Christmas is well on its way to being finished.

Finally, I made dog kerchiefs... Yes! Those things in the picture are for my mums dog. She asked if I could make her a couple and I thought they wouldn't take too long to whip up. She designed the pattern and gave me the sizes to suit her dog - a kelpie-cross. The first one took me about an hour and a half, but the second one was a breeze at only about 30-40 minutes. I only had red velcro, but I figured the dog won't mind!

They're going to be more than just cute too. Mum is using these as she has a hormone that assists in keeping her dog calm. He was a rescue from a farm where he was mistreated and the hormone really helps him manage stress when meeting people and in other situations that can upset him. The kerchief gives mum somewhere to spray the stuff where he can breath it in as he can't always be sitting on his mat for this treatment. He is a black dog so I used bright colours so hopefully he will look adorable too.

They're really easy to make, so if you have a dog you might want to try this.

How to make a Dog Kerchief

There are 2 parts to the kerchief. 1 x half square triangle (I folded an A4 sheet in half and added 1/2" all the way around) and a 21"x2.5" strip.

Hem the 2 shorter sides of the triangle. I used my rolled hem foot on the machine. Then take the strip, fold it in half and stitch down both sides and a short way along the bottom leaving the middle open.

Turn the ends and iron the strip, folding in the opening and ironing - we're just going to top stitch the triangle so it is enclosed in the strip next. Pin the triangle so that it is centred and inside the strip, then top stitch.

Attach the velcro (I used 3" pieces) and you're done!

Saturday, November 10, 2012

Cat Pouch


I've finished the little blue cat pouch and I think it is going to be an awesome Christmas gift!

There were a couple of really tricky parts to complete. Putting in the zip with the lining was very difficult and I don't think I'll do a curved zip like this again. I've done this technique before with straight zips - such as on the chicken purse - but this was a whole new layer of difficulty because the zip is not very flexible and the stitching needs to be quite close and precise. I took my time and got there with it despite some slight wonkiness.

The little fish on the strap was also really difficult as tiny things usually are. I think I spent as much time trying to make the little fish as I did adding the tail and head to the pouch base tonight. I planned on appliqueing the tail before sewing in the zip but completely forgot so I carefully sewed it to only the top layer of the pouch tonight. Then before sewing the opening in the lining I lightly stuffed the paws to give them extra body and squish. The lining is actually squared off and ends under the head.


Tuesday, November 6, 2012

Phone Case


I've had a cheap knitted phone case to protect my phone for a while, but due to wear it is starting to get too loose and is falling off in my bag. It is not much protection if it keeps falling off! So I decided I should make myself a phone case.

This is the same idea as my kindle cover, but in smaller scale. It was actually quite tricky to sew the lining and then top stitch because the opening is so small. My kindle cover doesn't have any quilting, but I decided to quilt along the hexagon lines on this design. The back of the strap (below) matches the lining. The fabrics are both Japanese which I think I got at a quilt fair a year or two ago.

The fit is tight at the moment, but like my kindle cover I expect it to relax a tiny bit as the lining and quilt batting settles into the right shape. The closure is velcro and I think my favourite part is the blue owl on the left which is peaking out from behind the strap.

It's good to do a couple of projects that could be completed quickly!

Sunday, November 4, 2012

Green Satchel Bag


I started this yesterday and spent a bit of deliberation time working out exactly how I would put in a couple of pockets with zips and make it look nice so this project took me a little longer than expected. Most of the work was done this morning and I think all up it has taken about 6-7 hours not including the time I spent thinking about this yesterday. It is 36 degrees today so I think my poor hot sewing machine needs a break for the afternoon!

The bag is approximately 15"x13" and I've squared off the bottom to about 2" wide. It is fully lined with a small outer pocket and a large inner pocket and the outer is quilted with quilt batting giving it extra strength and substance. The design evolved as I contemplated what I wanted to include and I used the straps as edging to hide the seams on the outer pocket which will also give it strength as well.

I took lots of other progress photos so if there is interest I could develop a pattern. This one is destined to be a gift so I'm also tempted to make one of these for myself, although I was going to do something with applique and more pockets for myself eventually (perhaps over Christmas)... but I think if I make one for myself it will have to be out of chicken fabric!


Saturday, October 13, 2012

Frog Finished


So here is a little frog with pins sticking out of him everywhere, holding him to the lilypad. He looks a little shocked... perhaps because of the location of some of the pins! He's been a little more effort that I originally expected, but really only took me about 3-4 evenings worth of stitching... what do you think? Is this something you would like to see as a pattern?

And here he is finished...


This is the back of the little purse and you can see the quilting stands out a lot more now. It is designed as a key holder, or key purse. The large ring has some small keyrings attached for keys and then you can either put a little bit of change inside the purse, or even slip the keys inside to keep them safe.

The body of the frog is stitched to the top of the lilypad, but his front feet are not stitched down and his back legs are pushed in so they are 3D and stitched only along the feet.

Friday, October 5, 2012

Rudolph has a Red Nose


I have this little guy all ready for Christmas. I created my own plush pattern from a mash up of a couple of different patterns I found online - simplified, added hooves, made up the ears... all sorts of changes that make it uniquely my own and I had a lot of fun doing it.

The head is version three. I had lots of issues getting the proportions right, but thankfully I only had to do those antlers once as they required a lot of patience to turn them right way around. I was really happy that the body looked so great first time.

Of course, nothing is complete lately without at least one LED light, so little Rudolph's nose really lights up red when you turn on a switch hidden underneath his collar.

Sunday, September 30, 2012

Jack-o-Lantern Completed!


Isn't it cute! I think I am addicted to LEDs. I was so excited to put the LEDs into this project that I finished it in 2 days. Conductive thread is a really cool thing to work with. It is just like a normal heavy cotton, like an embroidery thread, and yet once you have hooked everything together correctly it does amazing things like run these two LEDs.

The eye shape was designed just so there would be a little orange area to mount the LEDs on. I really like this project... I think I like this more than the robot project, though that was pretty cool too.

The circuit for these little 6" projects is quite simple so if you are new to electronics and want to have a play with conductive thread one of these little projects would be perfect for you. It would also be great as a holiday project for the kids. I think the instructions I've written out are fairly clear, but you could always leave me a comment or send me an email if you get stuck with it.

What else can I put LEDs into?... I really do think I'm addicted!!

Monday, September 17, 2012

Electrotextile Robot


Remember back to these humble beginnings? I ran into several snags along the way with this project but it is finally finished. Firstly, I managed to completely lose the prototype. Yep, it's gone! I turned my sewing room upside down looking for it, then the rest of the house and even the shed was thoroughly searched, but either I didn't do a good enough search job or I took this somewhere and it didn't come home.

The second snag was in the making itself. I put together a little robot design to use three LEDs and then stitched it together with conductive thread - it didn't work. So I had to research all my basic electronics knowledge and relearn how to hook up multiple LEDs. Two days later, after cutting away all my conductive thread and soldered the pieces together multiple times I finally had it working. This was not without issues as well... and melting the plastic around the battery holder a little, some swearing, and lots of resoldering!

After finally getting it right and drawing up a circuit diagram for the pattern I stitched it up in conductive thread. The conductive thread is really great to work with. It is thicker than standard cotton thread, more like a stiff embroidery thread, so I had hardly any tangles. It also made the circuit come together a lot quicker than my experiences in soldering it. I tried to be very thorough in the pattern instructions so that if you have no experience in electronics but still want to give this a go it should be beginner friendly!

Long story short: The robot is finally complete and the result is very cute!!


For the next week you can get 10% off on the pattern and/or kit by using the coupon code GOGOROBOTLED

Suggestions for new designs welcome. Head over to the Happy Bobbin blog for the chance to win a 50% off coupon for your suggestion!

Saturday, April 7, 2012

Space Invader Wall Hanging


Another finish today and I must say I didn't realise I've been putting this one off since 2009! Terrible!!

This project had been quilted, but still needed trimming and binding. It took most of the day today to get it squared and trimmed due to its odd size and then to work out how big to make my hanging tabs for the top and bottom. A little tweaking was needed there because I made them a little too big and because the hanging is supported top and bottom it was floppy in the middle.

Once I got it hanging correctly I tried out the machine binding tutorial I mentioned back in 2009 as well but hadn't tried due to a lack of a suitable project. It went reasonably well with only a couple of errors which I had to go back and fix. The good thing about black on black is noone will notice!

I think it looks pretty good hanging on the door. It is replacing a lace curtain which we usually cover with a solid curtain in Winter as a lot of heat escapes through the glass window in the door.

If you like space invaders you can get a pattern for piecing the red invader free. I'll be working on patterns for the other guys and the tank gun soon!

Friday, April 6, 2012

Circus Tent Quilt Complete


This one is finished! The quilting process took a little longer as I used masking tape as a guide for my quilting which took a while to stick around all the hexagons. It gave me even spacing between the piecing seams and my quilting. I needed to quilt within 10" according to my batting so I've left the quilting fairly open with the largest area being about 7".

The back shows the quilting lines even better. I selected a white thread so that it would blend in best on the animal print fabric and lightly contrast with the "circus tents".

The binding is the same dark patterned fabric as the blue hexagon which gave a nice contrast with the green back and complimented all the colours on the front. I'm pretty pleased with how this one turned out. I was hoping to get it done in a week, but 2 weeks is a pretty good effort to turn out a completed quilt! :)


Sunday, January 29, 2012

Kindle Cover


In addition to playing around with my blog layout to freshen things up for 2012 I've also completed a couple of small projects. I got a Kindle for Christmas and I absolutely love it. When the case I bought took weeks to arrive I ended up making myself one and decided I like the one I made better anyway.

The Kindle case is a little pouch with quilt batting to make it nicely padded. I made a second one for my Mum when she bought herself a Kindle soon after seeing mine. They're quite simple with a little half circle closure that fastens with velcro. If you'd like to know what I did to make one let me know in the comments!

I hope you had a great Christmas and New Year. (I should update more frequently!)

Wednesday, January 5, 2011

Completed Omiyage

Pinecone Omiyage
Pinecone Omiyage

YES! It was finished in time for Christmas and received by a delighted Oma. When she got it home she said it even matched a bedspread one of her friends made her some years ago. Mark must have subconsciously channeled his colour memory when I asked his opinion of what colours to use.

As I have mentioned previously, this design is from the book "Omiyage" by Kumiko Sudo. My suggestions for anyone attempting her patterns is to expect to handsew most of it. The patterns are small and intricate. The pinecone is made up of lots of small squares sewn in such a way that they form the pattern. It all had to be hand sewn because there was no way I could get the machine into the tiny places and hold all the fabric just so as I sewed. There is a nice sized pouch inside, which I actually made a little larger than the pattern specified.

Sakura Omiyage
Sakura Omiyage

This is another design from Kumiko Sudo's book. I made this for a good friend of mine and I know she has received it so I don't have to keep it secret anymore. I was able to machine sew the start of the petals, but the rest was all handsewn. The back has a little pouch, so small you can only fit tiny trinkets, but it is a really pretty design.

Sakura Omiyage (back)
Back of Sakura Omiyage

Here is a view of the back with the pouch open. I don't know if you can see from the photos, but the little tassle ends are also different. The Sakura had rectangular tassle ends with no padding, where the Pinecone had square tassle ends with a small piece of batting to pad it. I liked trying the different tassle ends to see which I preferred and I do love the padded ends on the Pinecone a little more. There are 5 different ways to do fabric bead tassle ends in the book.

I know I've been asked what fabric I used on these designs as well. I will find the fabrics and photograph them for you soon.

Saturday, December 26, 2009

Tea Set

Tea themed gift set
Coasters, Cozy and Pot Mat

I found this near the back of my Japanese "Patchwoork Classroom" magazine and was delighted to find the pattern was included. The instructions left a little to be desired in comparison to some of my other Japanese magazines, such as "Gosu Rori". There was a lot more writing and not quite as many drawings so a couple of inbetween steps I had to extrapolate from the diagrams and the photo of the final product.

Overall I would say there is just enough in these magazines for an intimediate to expret to construct the projects. You have to know some basic quilting skills and some basic construction techniques because even though they are demonstrated in photos at the beginning of the instructional section, you need to know when to apply them so I wouldn't recommend this for a first project. However if you are fluent in Japanese that may also help your understanding.

Tea themed gift set
Inspired to drink a lot of Oolong tea

My gift arrived at the recipient the day before Christmas - 6 coasters, tea cozy and pot mat all constructed out of the supplies I showed you earlier. The back of the cozy has three applique hearts in different fabrics with the words "tea", "coffee" and "time" embroidered. She nearly didn't get the 6th coaster, because while having every trouble in the world I'd forgotten to sew right sides together when turning something inside out... and had to unpick it after I'd trimmed into the corners. I didn't think I could resurrect the poor thing and was surprised it held together as well as the ones I did right.

If you are looking for the magazine for yourself, try a search for パッチワーク 教室 No.71 on ebay (you may need to install Japanese characters on your computer) I am a huge fan of the Japanese magazines because they contain so many more projects than English language ones and the instructions have a lot more pictres.

Wednesday, December 23, 2009

Chicken Purse

Chicken Bag
Chicken Purse

I found this adorable bag pattern online and had to have one to go with my love of chickens. It cost me $2.60 to make after buying a zip and going through my stash.

If you would like to make your own chicken, I found the pattern at whipup.net. It is a scan from a Japanese magazine, so you may have to redraw a pattern a couple of times until you get it the right size and there are no English instructions.

So that there are no unfinished seams inside the bag I made mine in a particular way, so it took me yesterday and today to complete this project.

To attach the zip I attached fabric to either side of the zip as you would a quilt binding. Then I made a tube of fabric, folded in one end and pushed the end of the zip into it, stitching it in place. I then stitched each side of my fabric tube and zip to a pre-prepared chicken body and once I had both sides sewn on bar 1cm I did the same treatment to the other side of the zip so that it is fully enclosed.

For the other parts the pictures should be enough to get you by, however I changed the wings and made them into little pockets. My bag turned out slightly bigger than the instructions at 11cm x 9cm which I put down to having to get a 12cm zip and size accordingly instead of the 9cm one recommended.

Chicken Bag
Better view of zip

If you make a chicken pouch come back and show me!!

Saturday, December 5, 2009

Sewing Kit

Sewing Set
Sewing Kit

This is something I made several months ago as a gift for a dear friend. I found it in my flickr gallery and thought it was about time I posted about it.

I created the bag from scratch with my own made up pattern. The base is the size of a CD and actually has a CD between the fabric for stability as a solid bottom. However I found an extremely similar pattern for you with the only difference being the way the handles were attached.

The other opjects pictured are a small notebook with embroidered monogram, pincushion, needlebook and accessory or thimble keeper. I also made a covered tape measure which is not pictured. All the items fit neatly into the bag which also has some pockets inside to stay organised. I especially loved the little red embroidery scissors and was tempted to keep them for myself.