27/04/2013: Almost May already! This year is going so fast!
02/04/2013: Happy Easter. I hope everyone had a fantastic weekend.
01/01/2013: Happy New Year!!
24/12/2012: Merry Christmas!!
13/11/2012: Getting hand-made presents ready for Christmas!!

Sunday, January 24, 2010

More Fabric!

Fabric Haul
Inspired by Tarnished Metal

I headed out to Tricia's Discount Fabrics yesterday with two aims - to show a good friend a fantastic fabric store, and to increase my stash.

I have a specific purpose in mind for this fabric, however I am still working on my patterns at the moment. It may be some time before I can show off what I will eventually make with this lot, but I am very excited about it.

The 5 fabrics on the left are a little scrunched as they were pre-cut fat quarters and need an iron. The rest I bought 1/4 metre of each. At the far right is a stunning fabric from what I believe may be a new line: "Floragraphix III Swallow Clock In The Beginning Fabric".

The discovery of that last fabric made me rethink some of my choices and add in a green. Finding "tarnished" greens is quite difficult though.

I'm excited! I hope you'll stay in touch to find out what I'll be making from this selection over the next few months or possibly over the rest of this year. As always, click on the photo for a larger view.

Sunday, January 17, 2010

Patchwork Classroom #71

パッチワーク 教室 No.71

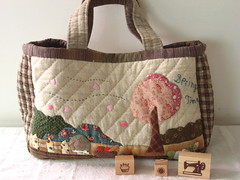
Here is a closer look at one of my Japanese Mooks*. This is Patchwork Classroom Volume 71 which contained the beautiful Tea Set which I made in December last year.

Japanese Craft/Sewing mooks all tend to follow a similar format from my experience. The front half contains beautiful photographic images of all the projects with short descriptions (in Japanese) and a page number to the back section. This makes for a beautiful contrast to Australian magazines which tend to follow each project with the instructions. The Japanese magazines are more elegantly designed for browsing and admiring the projects within.

Inside the Magazine

The second half of the magazine contains the instructions for all the projects in sepia or black and white. There is also a lift out pattern sheet. This magazine is 114 pages with approximately 70 dedicated to project photos and advertising and 45 pages of project instructions. I counted 48 different projects and there is a heavy focus on bags and purses throughout this issue (approx 2/3) with only a few wall hangings and zakka** projects included.

The reason I chose this book is primarily because of its focus on bags. There is a treasure trove of bag designs within the magazine and a few of the styles show what the same bag would look like if you complete the patchwork, or the colours, or the quilting in a different way. This really helps you see the potential for customisation of the projects.

A point to remember is that these projects are usually designed for hand piecing and hand quilting and so the instructions are based around particular hand sewing techniques, however I don't see anything stopping you from using your preferred techniques with their patterns.

Example of Instructions Provided

If you are interested in Japanese magazines, but do not understand the language then you need not fear. Page numbers and measurements are all in standard western numerals while the instructions contain much more detailed diagrams than you would find in western craft magazines. If you take some time to explore your mook you will soon learn where to find the page reference for the instructions and how to skim through the written instructions and match characters to understand your fabric requirements and notions. I would recommend these magazines to intermediate quilters or sewers to avoid frustration unless you are fluent in Japanese.

Are you interested in this exact magazine. Buy it now on ebay. (I have bought from and recommend this seller, but I am not affiliated with them in any way)

* Mook - A hybrid between magazine and book.
** Zakka - Handmade household goods such as tableware or soft furnishings usually also charming or cute. This tea set would be considered "zakka".

Monday, January 11, 2010

Basket Weave Rainbow

Basket Weave
Basket Weave Rainbow

It has taken me longer than I expected to create these blocks, though I guess it has really only been a 4 day project so far. These blocks are a little tedious to make and we are currently in the middle of a heat wave which has made some of the processes (ironing) less than appealling.

I cut 2" strips from my fat quarters and then pieced them together, which were then cut into three blocks each. I had previously cut into some of my fabric so for the purple in particular I had to be creative with my cutting to get out the maximum number of blocks.

I now have between 18 and 24 of each colour, however I need a large area to place them out. I currently have a sick hen taking up my spare corner in my sewing room. Hopefully she can go back out when the cool change hits and then I can spread out on the floor because the kitchen table isn't big enough.

Sunday, January 10, 2010

Bee in my Bonnet

Paper Doll Applique by Bee in my Bonnet

Isn't this a gorgeous and unique idea. This is just a small part of one of Lori's designs which I wanted to share with you. Please have patience while her site loads as it is worth it! It has so many beautiful images and step by step pictures to create all the elements in Lori's absolutely stunning paper doll blocks. There are so many details and with each of those tiny elements it looks like another great way to use up your scraps. Now no scrap of fabric will be too small to save!

Looking further through her blog I don't know if the paper dolls are available as a pattern yet though perhaps she would welcome an email enquiry if you are interested. She has all her available patterns at this link.

I think what I like about these patterns is that they remind me of the whimsical style many Japanese/Asian textile artists use in their creations and the style inspires me, just like I have found so much inspiration from Story Quilt.

Casual bag
A Patchwork Bag by Story Quilt

Friday, January 8, 2010

Basket Weave

Rainbow of Fabrics
Rainbow of Fabrics

Last week I mentioned that I had been sorting through my stash fabric and found a set of fat quarters in bold bright colours. Yesterday I went to Tricia's Discount Fabrics new store (11-13 Price St, Edwardstown, South Australia) and bought an extra fabric in each colour so that I have three of each of the bold fabrics. Chain stores like Spotlight have really terrible colour ranges at the moment so I had no choice but to go to Tricia's, and I am glad I did as it is at least 4 times the size and still wall to wall fabric. She will soon have a whole room for fat quarters as well as a class room and a chatting room as well! What a store!

Now that I have enough fabric I have started working on another project which I will be doing inbetween the Quilt Along. I am using a strip piecing method to create 6.5" basket weave blocks.

Basket Weave Blocks
Yellow Basket Weave Blocks

You can see I've started on yellow. First I cut each of my fat quarters into 2" strips and pieced them together with black on either side. After ironing the seams open I cut and trimmed them into 6.5" blocks. After trimming I had a thinner black strip than the coloured strips which I think will work very well into setting off the basket weave design while allowing the colours to dominate.

At first I cut my strips 7" wide because I had 21" to work with. Once I attempted to place out my first three blocks I quickly saw that the key to this design is that you must have square blocks. The design contains the same block over and over either straight or turned 90 degrees so you must have a square.

You can see how the basket weave will come together in the photo, however I plan to work the other colours into the design as well. It is such a simple design and easy block, but I know it will look great as you can see from my inspiration.

Thursday, January 7, 2010

Bicycle Clips and Stippling

Quilting Setup
Quilting Setup for Invaders project

I thought I would show you my setup for quilting the invaders. You can see that I have a nice clean desk which is a corner style. This gives me plenty of support on the left hand side of my machine when I'm quilting and I can move my machine around to the best position. I also have a fantastic light with two brightness settings and two articulation points so that I can see what I am doing from any direction.

For a lot of this project I had my machine closer to the corner where I could get the whole width of the quilt spread flat. I also found that pushing the machine back away from me gave me space at the front of the machine to support the fabric there. You want a lot of support when trying to stipple because you don't want to fight with the weight of the quilt. For example, if it hangs off the edge of the table you will have extra weight pulling against you as you try to ease the fabric back and forth under the needle.

You can also see in this photo that I found a use for the bicycle clips which I purchased when quilting my first quilt and found too awkward to use at that point. They really helped this time to keep one side wound up and secure so that it didn't fall off the edge of my table. They work best when they are tight around the fabric and I used three along one side to keep it secure and out of my way.

The quilting is finally completed and I count this a great success for my first attempt at stippling. Of course there are a lot of teething problems but I allowed myself to have a go and to make mistakes so that I could learn. Do have a browse through all the free motion designs and instructional videos by Leah Day as they are such a great help for a beginner and I am sure anyone could get something out of her fantastic blog.

Monday, January 4, 2010

Learning Free Motion Quilting

Free Motion Stipple Trial #2
My Second Free Motion Stippling Trial

So I've stitched in the ditch and used a basic diagonal quilting technique. Neither of these techniques are going to work on the Invaders as it is mostly black so necessity is forcing me to learn how to free motion stipple.

It is a very intimidating technique to begin. The first thing is to create a practice quilt sandwich. Two practice strips later I am still too tense and a little jerky, but feel I could begin a larger piece.

First change to your darning foot and then you want to get your tension right. Do a little test patch then look at the back of your work. If there are loops being formed on the underside increase the tension - I had to increase my top tension up a lot - and try again. Once your tension is right, adjust your speed to a comfortable setting. I have reduced my speed to half way which is not too fast, but not too slow for me either. Now you're ready to practice.

The best technique I found is to try to make two curves on one side and then two in the other direction. Move the fabric around and with a little practice you should see a random pattern emerging. Try to keep your spacing even and try not to overlap any stitching you have already done. If you are right handed work from left to right. When you get to the right hand side turn your fabric either 90 or 180 degrees and keep going. You could also find a diagram of a simple stipple online and practice drawing it on paper to learn the curves you want to achieve.

Free Motion Progress
Quilting on Invaders Started

Another top tip: Don't forget to lower the foot on your machine or you won't be able to sew at all I actually forgot this myself as my darning foot doesn't sit right down on the fabric like a normal presser foot so it is difficult to tell if it is up or down at a glance.

Great Video Tutorial by Leah Day

Sunday, January 3, 2010

First Invader Pattern

Invaders Wall Panel
Laid out for basting

I am getting a little ahead on the quilt-along so I have pulled out this project again. After I have basted it I will have a practice at stippling. I was a little generous with the batting. It was a cot size which I had to trim and make a little longer. The project is about 170 x 70cm.

I've been working on patterns for this project and the Red Invader is ready. If you download it, please have a read through and let me know if it makes sense and if there is anything I could improve upon.

Red Space Invader Pattern