27/04/2013: Almost May already! This year is going so fast!
02/04/2013: Happy Easter. I hope everyone had a fantastic weekend.
01/01/2013: Happy New Year!!
24/12/2012: Merry Christmas!!
13/11/2012: Getting hand-made presents ready for Christmas!!

Tuesday, September 29, 2009

Owl Quilt Front

Cot Quilt for Baby Boy
Close Up

Here is a quicky I have been working on. I cut out the squares on Saturday and sewed it together on Sunday. There are 120 5" squares making up this cot sized boys quilt top. The large pattern is the gorgeous owls I showed in a previous post. I have a little of that material left over so my friend will be happy as she was hoping to have enough for another small project.

Quilt Top for Baby Boy
Quilt Top

For the back I have started some quick piecing. I made a large interesting strip from all my off cuts and need to get some cream material for the rest of the backing.

Saturday, September 26, 2009

Cutest Baby Boy Fabric

Owl baby quilt
Cot Quilt Fabric Choices

Check out these Hooters! My friend chose these adorable owls to decorate her baby boys room. She has made a simple blanket and painted up some canvases, and has kept some fabric left over for me to make a quilt. I've added a selection of matching colours and am about to embark in an epic sewing streak as I picked up the fabric today and want to have it done in 2 weeks for her baby shower.

It is actually quite hard to match fabric. Most stores seems to get certain lines of fabric which all match together but don't match to anything else. The blues in the owl fabric were extremely hard to match, especially as this is for a boy and fabrics seem to tend towards florals. I've been looking around for a while with a small swatch, but have resigned myself to simple prints and flat colours for this one. If it looks to plain (and I have time) I may do some applique.

Friday, September 25, 2009

Pieces Coming Together

Cat Quilt
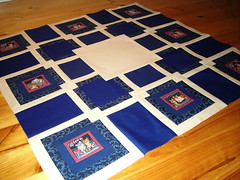
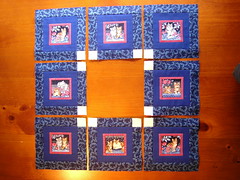
Pieces joined together

Well that centre block caused some headaches, but I finally have it all together. I made the mistake first of trying to avoid extra seams and pieced the solid cream block into a square border. It didn't work, but luckily I'd made everything a little bigger meaning that I could cut my mess up and salvage most of it. The extra seams in the corners aren't as bad as I thought they would be. I am quite happy with this overall.

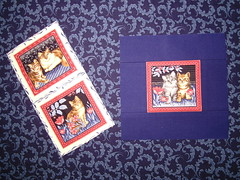
I pieced the centre block (twice) yesterday. The headaches were mainly due to the centre cream block needing to be an inch larger than the small pieced cat blocks in order to take my circular applique. Hence the eventual addition of extra seams in the corner so that everything was pieced in straight lines.

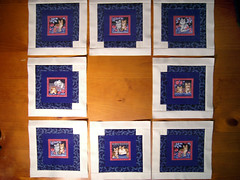
You can see now why I have been busily piecing those cream borders and trying to be as accurate as possible. I am extremely happy with how everything has lined up. This is my second quilt after all and I have never done anything like this before!

The whole lot is around 95cm square at the moment and I am going to add some simple borders around the edge, then it will be ready for quilting. The borders will probably add around another 30cm all the way around giving me roughly a 150cm square, or 59" in the old money.

Tuesday, September 22, 2009

Second and Third Borders

Second borders
Second Border

The next round of borders include cream corners which were time consuming to construct. The previous round had to be trimmed so that it would end up a 5" square and then everything needed to be lined up and sewn as accurately as possible. It isn't perfect as I am a millimetre out in places... but I hope it is good enough! I have used the unpicker too many times on this round to be too fussy!

The next stage of my design is a cream border. This is my "make it up as I go along" construction technique. I have a "pattern" that I created in Photoshop that I can refer to, but there are some parts where I am still wondering where to add seams to construct what I have designed. I seem to have a habit of selecting complex projects.

Third Border
Third Border

And here is border three! It went on a little quicker than the last and now I am working on the conundrum that is the centre piece. It may be a little longer before the next update!...

Saturday, September 19, 2009

A New Beginning

William Morris Cats
William Morris Cats

Another beginning and this time the key themes are blue and cats. I purchased the cat fabric from an ebay seller and am absolutely delighted at the quality of this print. The small blocks are almost perfect 3" squares, and their imperfection is only noticable when you're trying to measure.

This block was my test piece to see if the rich dark blue was going to be too much or just right, but I have now completed 8 blocks. I think the next round will be the blue patterned material you see in the photo, and then each block will be highlighted by cream. You'll see what I mean as I progress. I've bought so many other blue fabrics trying to work this out, but I don't think I'll use them now! Whoops!!

I have been playing around with designs for a couple of months trying to work these gorgeous blocks into a design with a larger centre piece and I think I've finally decided on something that I like. I will be "making it up as I go along" however as I have never done anything like it and I don't have any instructions to guide my piecing. I will take what I know, a pinch of good luck, and hope for the best! Over the next month or so I am hoping to get a lot done on this quilt top so I hope you will stop back to see my progress!

Thursday, September 17, 2009

Making a Circle

Making a Circle
Gathered Circle - Back View

Breaking out of squares and straight lines can be difficult but rewarding. Any unusual shape in quilting is usually applied with some form of applique, whether the stitching is decorative or hidden. In this instance I wanted a circle so that I could crop away all the unwanted background on my custom printed fabric.
  1. Create a template using quilters template plastic. It is only a couple of dollars and I've made several projects now with the single sheet I bought to help me create a perfect shape. It is also transparant so that before you cut your material you can ensure that your shape is large enough to show the desired area.
  2. Iron on interfacing cut to the size of the finished shape, then sew about 1/4-1/2" outside of your template with the longest stitch to gather. One this instance I made two gathering lines at 1/4" and 1/2"
  3. Position your template plastic on the back of your fabric and carefully pull one of your threads to gather the fabric.
  4. Carefully iron the edge of your shape, being carefull not to melt the plastic, then remove the plastic. The shape should hold while you ease out your template... give it another iron. I placed a tea towl over the front for final ironing so I could get some good heat through without worrying about damaging the fabric.
One more thing you may want to consider is whether you need interfacing. In this case I did use interfacing cut the size of my final shape. Sometimes it is not needed.

The fabric used here is the custom printed fat quarter as seen in this post.

Sunday, September 13, 2009

First Finish

Finished Quilt
Finished Quilt

I have finally finished my first quilt after a determined evening in front of the television to hand sew the binding. I am very happy with how my first quilt has turned out and am looking forward to starting the next one already.

The border is in the same floral as used in the quilt and is a nice splash of colour on the edge. It is more visible in the previous post.

Saturday, September 12, 2009

Quilt Binding

Binding
Quilt Binding

The end is in sight! This is my first quilt binding, attached and ready for hand sewing. The picture I chose shows some of the quilting from the back. I quite like the pattern of the stitching.

I referred back to the instructions I posted earlier from Old Red Barn Co, but instead of trimming first, I stitched the binding on first and then used my rotary cutter to trim the excess off after. I don't know if this means that I will have a wobbly edge after. I hear there is no right way... and I trimmed before quilting so it seemed ok.

Thankyou everyone for your comments so far. Hearing that other people are having the same trials makes me more confident that I'm doing it right :)

Quilting Completed

Quilting
Quilting Completed!

There was a point during this project when I thought the end would forever be in the distance, however this week I have spent several nights in front of the machine in an effort to just get that quilting done. Stitch in the ditch on this design is full of tedious short lengths, awkward turning and lots of ending off and starting again.

It was fantastic to finish all the blocks and do two rows of straight border stitching. I even worked out how to use the guide bar. It was a little awkward to keep affixed and kept jumping off because I hadn't locked it in right. I was very glad of it while doing the outside border quilting and happy I paid a little extra for a walking foot that came with one.

Does anyone else find they get sore shoulders while quilting? I found that in trying to manipulate the bulk of the quilt I was hunching my shoulders up to get leverage. I quilted for a good 4 hours or so tonight and moved my machine back and to the left on the desk. The result was that while the machine wasn't directly in front of me, the needle was and the extra table space in the front helped take the weight of the quilt reducing the strain on the needle and machine. Success!!