27/04/2013: Almost May already! This year is going so fast!
02/04/2013: Happy Easter. I hope everyone had a fantastic weekend.
01/01/2013: Happy New Year!!
24/12/2012: Merry Christmas!!
13/11/2012: Getting hand-made presents ready for Christmas!!

Wednesday, July 29, 2009

Spoonflower Custom Fabric

Cat Fabrics

I discovered Spoonflower a couple of months ago and it gave me a great idea. I could get a print of my Nanna's cat and include him in a handmade quilt for her as a Christmas gift. Today I received the fabric in the mail.

It cost me AU$18 for printing and postage for one fat quarter in quilter's weight cotton. Now that I can see the printing I would suggest that if you are getting a photographic print to reduce the amount of colours in an image editing program first before you order. The actual ordering system of Spoonflower is great, allowing you to change the size and alignment of your image and even tile it and preview how it will look before you continue. They also have an online system that updates when your order is processed and sent so you are always informed of the progress.

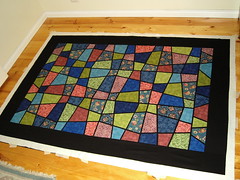
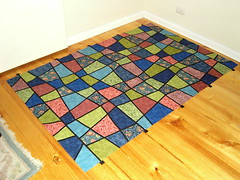
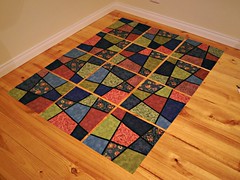
The other fabrics you see here are some William Morris small 3" cat squares in blue and pink, some additional cat squares and some cat prints from Debbie Mumm. I'm hoping to create a blue tonal quilt with the photo as a centre piece and red/pink highlights.

Saturday, July 25, 2009

Basting with Safety Pins

Ready to baste

After adding a black border to my quilt top I constructed a backing from two lengths of black cotton and some left over floral. Creating a back from two kinds of fabric I hope will add interest as well as having saved me a little money.

To baste I laid out my bacing piece and secured it with masking tape to the floor. Then I smoothed out my backing fabric and secured that as well. Both of these layers are approximately an inch bigger than my quilt top all the way around. Next I smoothed out the quilt top to finish off my quilt sandwich.

To baste, beginning from the middle, I secured safety pins a couple of inches apart ensuring that none of them laid across an area I planned to quilt. The pins I used are Number 2 nickel plated safety pins and to close them easily I used a soup spoon to lift the points. The pins went through all the layers easily and were simple to close without moving the quilt layers.

Once all the pins are in - almost 100 of them - the quilt is able to be moved around and manipulated through the sewing machine. Time to start quilting!

Tuesday, July 21, 2009

Joining Batting

Joining Batting

While trimming my batting I accidently managed to cut a big sheet in half. Apparently measuring and double checking twice was still one time too few. Here is one very good reason why I should not try to sew while I'm sick! After a moment of dispair I decided that this must be fixable so I took the two pieces to my machine and used a broken zig zag stitch to join the pieces back together.

I fed the pieces through so that they butted together rather than overlap because I don't want to end up with a lump in the quilt. Once the pieces were joined the batting was relatively strong and this may even be a way to join together all the off cuts to save money in the future.

Tuesday, July 14, 2009

Patchwork Book Cover

Note Book Cover

I played around with some scraps and made a small book cover using a tutorial that can be found over on Bloom's blog. It turned out quite well despite the amount of unpicking I had to do while my poor cold inflicted brain absorbed the instructions, which are actually rather easy. I just wasn't taking it all in yesterday.

I am also planning a second big quilt project even though I haven't finished the first yet... that is always the way right?

Today I have ordered my first fat quarter custom print from Spoonflower. I hope that it turns out however I had to use their internal editing as I don't have any of my usual programs after my latest giant computer crash. To spoil any upcoming surprise, I am getting a photo of my Nan's cat printed onto fabric to be the centre of a quilt design. I am giving myself until Christmas to get this one done. Hopefully I get it finished in time. I have ordered a couple of other fat quarters from ebay and will start my colour matching once they all arrive.

Sunday, July 12, 2009

How to: Quilt Binding

Old Red Barn Co's Tutorial

If the youtube videos I mentioned earlier weren’t clear enough I have just discovered a fantastic photographic tutorial on preparing and finishing your quilt binding. Head on over to the Old Red Barn, and if you’re interested there is currently an opportunity to win a Janome 6600!

Friday, July 10, 2009

Standard Quilt Sizes

Warm & Natural Batting

I don't know why I didn't think of this before, however after I got frustrated with every website and book telling me different standard sizes I kind of gave up. Today while in Spotlight looking at batting I noticed some pre-cut packs of the Warm & Natural which had the sizes marked, which is a brand or type I had been recommended on a quilting forum.

Craft - 34" x 45"
Cot - 45" x 60"
Twin (Single) - 72" x 90" or 180 cm x 220 cm
Double - 84" x 96"
Queen - 90" x 108"
King - 120" x 124"

The price for a twin size is just over $50 for the Warm & Natural (a cream colour) or just over $65 for a Warm & White which is apparently designed so that the batting doesn't show through lighter colours (whites and pastels) and alter or darken their appearance.

Sunday, July 5, 2009

In One Piece

Quilt top update...

The strips were pieced and then I attached all the pieces with black. The top strips were nicely randomised and didn’t line up which was the aim, but the bottom strip is almost perfectly in line with the straight black lines. I don’t know which I like better, but overall I am pretty happy with this so far.

Tomorrow I need to obtain some more black cotton if I want to complete the top this weekend as I need more to make the border.

Here it is laid out on the floor again as one big piece. Isn’t it fun to cut material into small pieces and sew it back together again!

Friday, July 3, 2009

Finished Quilt Blocks

Quilt Blocks

After completing all the blocks I have now sewn each lot of three into rows with a black border in between. The most time consuming part of the past week has been thinking over my design ideas again.

The blocks work out to being about 12″ too short for the bed I want to put it on so I need to add some length. I decided I had a choice of either adding another 3 blocks, which would mean finding more of the same fabric, or making some strips out of my offcuts. I had a look around and found that some of the fabric I used is no longer available, so I decided on strips.

Here are all the blocks laid out before I joined them into their rows. They will all be getting a black border between them. Tonight I hope to get the second strip finished and start sewing it all together so I can show you the finished quilt top very soon.