27/04/2013: Almost May already! This year is going so fast!
02/04/2013: Happy Easter. I hope everyone had a fantastic weekend.
01/01/2013: Happy New Year!!
24/12/2012: Merry Christmas!!
13/11/2012: Getting hand-made presents ready for Christmas!!

Sunday, December 27, 2009

Too Much Stash!

Stash
Fat Quarter Collection

Between sales and gifts my stash is starting to get a little crazy so I have been looking for some ideas on what I can do to use up my growing collection of scraps and stash fabrics.

My first thought was a sampler quilt using a different colour for each block, but I began with cream as a base colour and even before my first block was completed, I realised that I am not a cream or light colours kind of person. I couldn't see the block in my house on a quilt I would actually like. So that idea was shelved and I pulled out my black scraps.

Finding inspiration in Red Pepper Quilts I then cut began cutting my 3" square scrap stash into quarters and piecing them with black. The result is a slowly growing collection of what will be 1" splashes of colour.

Scrap Use
1.5" Coloured Squares

This projects may take a while as I have been sewing a few squares together at a time, and adding to the collection of fabrics as I work on other projects. My hope is that I will use each fabric for only one 3" square, for a total of 4 small 1" colour blocks. I don't know if this counts as a charm quilt, but it is certainly going to be a scrappy quilt.

For stash busting... I am wondering if I should do a colour wheel quilt, or do some crazy quilting blocks in each colour of the rainbow. I need to do something as I'm running out of room for new fabric.

How do you use up stash fabric, especially when you've had a fabric for a little while and it doesn't match any of the new fabric ranges...?

Saturday, December 26, 2009

Tea Set

Tea themed gift set
Coasters, Cozy and Pot Mat

I found this near the back of my Japanese "Patchwoork Classroom" magazine and was delighted to find the pattern was included. The instructions left a little to be desired in comparison to some of my other Japanese magazines, such as "Gosu Rori". There was a lot more writing and not quite as many drawings so a couple of inbetween steps I had to extrapolate from the diagrams and the photo of the final product.

Overall I would say there is just enough in these magazines for an intimediate to expret to construct the projects. You have to know some basic quilting skills and some basic construction techniques because even though they are demonstrated in photos at the beginning of the instructional section, you need to know when to apply them so I wouldn't recommend this for a first project. However if you are fluent in Japanese that may also help your understanding.

Tea themed gift set
Inspired to drink a lot of Oolong tea

My gift arrived at the recipient the day before Christmas - 6 coasters, tea cozy and pot mat all constructed out of the supplies I showed you earlier. The back of the cozy has three applique hearts in different fabrics with the words "tea", "coffee" and "time" embroidered. She nearly didn't get the 6th coaster, because while having every trouble in the world I'd forgotten to sew right sides together when turning something inside out... and had to unpick it after I'd trimmed into the corners. I didn't think I could resurrect the poor thing and was surprised it held together as well as the ones I did right.

If you are looking for the magazine for yourself, try a search for パッチワーク 教室 No.71 on ebay (you may need to install Japanese characters on your computer) I am a huge fan of the Japanese magazines because they contain so many more projects than English language ones and the instructions have a lot more pictres.

Wednesday, December 23, 2009

Chicken Purse

Chicken Bag
Chicken Purse

I found this adorable bag pattern online and had to have one to go with my love of chickens. It cost me $2.60 to make after buying a zip and going through my stash.

If you would like to make your own chicken, I found the pattern at whipup.net. It is a scan from a Japanese magazine, so you may have to redraw a pattern a couple of times until you get it the right size and there are no English instructions.

So that there are no unfinished seams inside the bag I made mine in a particular way, so it took me yesterday and today to complete this project.

To attach the zip I attached fabric to either side of the zip as you would a quilt binding. Then I made a tube of fabric, folded in one end and pushed the end of the zip into it, stitching it in place. I then stitched each side of my fabric tube and zip to a pre-prepared chicken body and once I had both sides sewn on bar 1cm I did the same treatment to the other side of the zip so that it is fully enclosed.

For the other parts the pictures should be enough to get you by, however I changed the wings and made them into little pockets. My bag turned out slightly bigger than the instructions at 11cm x 9cm which I put down to having to get a 12cm zip and size accordingly instead of the 9cm one recommended.

Chicken Bag
Better view of zip

If you make a chicken pouch come back and show me!!

Saturday, December 19, 2009

Piecing Triangles

Triangles!
Triangle Experiment

I've seen the beautiful triangle quilts with hundreds of little triangles joined together and arranged by colour to create beautiful patterns. This is my experiment piece. It is harder than it looks!

To create this square I started with a small pile of 3" squares cut from scraps of various projects. I paired each blue square with a green square and drew a guide line along the diagonal. Then I stitched 1/4" either side of the line, cut down the line and pressed each square open.

The difficult part I found is that the squares had to be SO ACCURATE! Otherwise the pattern made from the colours doesn't line up properly. I absolutely love how it turns out though, so I think that once I have had a little more practice with piecing I will give this another go and try a larger project. I have a vision of a lot of bright colours pieced together to form squares like this to use up all the little scraps I'm saving up.

Beautiful Triangles by Red Pepper Quilts
Yeah! This is what we can aim for :D

Monday, December 14, 2009

Together At Last

Space Invader Army
Army of Invaders

I must admit I am really happy with the bright colours and how this has gone together. All of the pieces are complete, including a laser bullet being shot from the tank. The colours are bright and cheery and beautifully contrasting with the black.

It is quilting time! I'm not quite sure what I should do for quilting, but perhaps I should experiment with some free motion on this one. It isn't very wide at only 26"x70" so it should be easier to manipulate than a full blown quilt, but I will have to practice first.

How would you quilt something like this?

Sunday, December 13, 2009

Offsetting the Invader Blocks

Offset Invader
Angled block

Cross fingers and cut... it worked! Do you ever quilt like that?

I am proud of being self taught in all aspects of my sewing. I paid very little attention to my year 9 sewing teacher and hated anything to do with getting behind a machine back then. None of my pieces turned out right and it was just plain frustrating. However once the inspiration struck me in my early 20s I was determined to make whatever it was I set my mind to.

Todays challenge has been taking my Space Invader blocks and making them angled. I added a 2.5" border to the block, then lined it up on my cutting board and recut it into a rectangle. I don't know that this is the best way to do this, but it worked.

I've also made the tank, which was a very easy block.

Space Invaders Tank
Reporting for battle, Sir!

Saturday, December 12, 2009

Space Invader Orange

Space Invader #3
Third Space Invader touches down

Here we are with space invader number three. This is the third and last invader which has been constructed for my wall hanging. Next in the project is construction of the tank and a laser bullet.

In my opinion, the piecing was a little more complex on this one, which surprised me, however I am especially happy with the bottom of this pattern.

Friday, December 11, 2009

Winners...

And the winners are...

I think I may have caused some confusion in the wording of when entries closed. I have learnt for next time, and will include all entries in the draw. I've gone over to random.org and had the website select me 2 lucky winners.

The winners are:

Entry 4: Carin
Carin said: My favorite block is anything that doesn't have y seams or to many triangles. LOL :O)

Entry 13: free indeed
free indeed said: First choice is #1 but will be happy with #2 if drawn second. Favorite blocks I think would be string blocks right now...using up all the edges of my fabrics. I also am into selvedges lately too :) Just love to be FRUGAL I guess!

I'll attempt to contact you via your profiles to let you know you've won.

It was interesting hearing about everyones favourite blocks. I had to look a couple up which I hadn't heard of before. Most people seem to have a lot of love for pinwheels at the moment, and a lot of people are in to using every last scrap of fabric.

I also want to thank everyone for stopping by and leaving a message. I really enjoyed hearing everyones comments. Thankyou!

Monday, December 7, 2009

Space Invader Blue

Space Invader #2
Second Invader Arrives

The second design following the space invader theme has been constructed. I used a quick piecing method again by formulating a plan, cutting out all the squares and rectangles and then building larger blocks which finally joined together to make the complete piece.

I have been asked for a pattern, so I will work on one and hopefully have something ready to give out in the next month or so.

Saturday, December 5, 2009

Christmas Giveaway

Giveaway!
Giveaway Prize One

As a giveaway leading up to Christmas I would like to add to your stash. I've never done a giveaway before, so I hope that this is good for my first one!

For first prize option I have two Fat Quarters of the same material I used on this project. You'll get 1 fat quarter of red material with a black and white sewing theme pattern and 1 fat quarter of black and white spots. Add black and you should have plenty of material to create your own sewing kit, or use it for your own projects. You'll also get Country Patchwork & Craft Vol 6 No 1, which has a pattern sheet still attached. There are lots of great projects in this one, but I ended up with two copies somehow. This magazine is brand new.

Giveaway!
Giveaway Prize Two

A second prize option is a selection of 15 3" charm squares with no duplicates.

To enter, leave a comment below and to make it interesting please tell me what your favourite type of quilt block is. If you have a prize preference leave it in the comments, and first person drawn will receive their first pick.

I'll be drawing the winner on Friday to allow 2 weeks before Christmas for delivery so please leave a comment by 11.59pm on the 10th Dec. (when is that in your country)


UPDATE: ENTRYS NOW CLOSED

Sewing Kit

Sewing Set
Sewing Kit

This is something I made several months ago as a gift for a dear friend. I found it in my flickr gallery and thought it was about time I posted about it.

I created the bag from scratch with my own made up pattern. The base is the size of a CD and actually has a CD between the fabric for stability as a solid bottom. However I found an extremely similar pattern for you with the only difference being the way the handles were attached.

The other opjects pictured are a small notebook with embroidered monogram, pincushion, needlebook and accessory or thimble keeper. I also made a covered tape measure which is not pictured. All the items fit neatly into the bag which also has some pockets inside to stay organised. I especially loved the little red embroidery scissors and was tempted to keep them for myself.

Friday, December 4, 2009

Stash Building

Stash Building
Stash Additions!!

40% off anything, including sale items? How can I say no to that? Well my bank account tried to scream no, but I didn't listen.

I bought some more batting, which was an additional 20% off as well as selecting some fabrics. These are just my favourites of what I purchased. There is a set of five aqua and lime green FQ, and a set of 5 orange and brown FQ as well as a metre of blue and brown which has 8 different printed patterns. They're not all the same width which is a little disappointing, but I can see some potential and hope I bought enough for whatever this eventually becomes.

The Fat Quarters worked out to a little under $2.50ea for that gorgeous fabric so I can't complain about that!! The orange and brown set is my favourite at the moment. Now I need an appropriate project to show them off. Any ideas?

I've made some progress on a project from Patchwork Classroom magazine. Stay tuned for an update in the next week or two.

Saturday, November 28, 2009

More Supplies

Project Supplies
Fabric and Supplies

I headed down to Tricia's Discount Fabrics today because I was down in her general direction and I wanted to pick up a couple of things for a project in my new Mook* "Patchwork Classroom". They currently have a buy 2 get one free sale going on, so I got a free Fat Quarter with my purchase. I also picked up a few things at Spotlight and I'm ready to trace the pattern and get started. I'll keep you updated as I go.

* Mook is a name for a Japanese Magazine-Book. Patchwork Classroom is chock full of designs, complete with a large pattern sheet in the back. It cost me approximately $30 to get a copy from ebay to have a look and I am impressed. It is a lot like some of the other Japanese Mooks that I own. Of course it is in Japanese, but someone who is confident at patchwork could work out the processes from their fantastic diagrams without any knowledge of the language.

Friday, November 27, 2009

Machine Binding

Red Pepper Quilts Binding

99% of all quilt binding tutorials online involve creating your binding, machine sewing it to your quilt and then hand finishing. I just found the perfect tutorial on Red Pepper Quilts for a technique I am definately going to try.

The techniques described for joining the binding overlap leaves a much less bulky seam than other methods I have seen. It looks like it may be hard to work out the first time, but I am sure once you get the hang of it that it is an easy method.

The best part is the description of how to top stitch the binding with your machine. I have been worried about stitching through all those layers and coming up with a straight seam that catches both sides of the binding. This makes perfect sense and it should be relatively easy.

I had to read through this four times, so be patient with it. If you have a little more experience it might make perfect sense first time.

Once I have finished my Invaders design I am going to try this method of binding as I will be using black binding on black fabric so any little mistakes will not be noticeable.

Wednesday, November 25, 2009

Space Invader Red

Space Invader
Space Invader

The first invader is now alive! I have been meaning to start this for a couple of weeks and finally sat down and did it. I created a pattern from paper several weeks ago and they have since been guarding the door and flying off in the breeze, practicing their attack formations (drop down one level and speed up!)

So here is Space Invader Red. I have decided to go with colours instead of black and white and have chosen orange and blue for the other two at this stage. I am using the fabric I have left over from making pacman ghosts.

I decided on a strips technique rather than piecing squares so it doesn't look pixellated. Unfortunately a couple of lines are not quite lined up so I won't be able to quilt it into pixels either. I think that the overall effect will be exactly what I want though.

Sunday, November 22, 2009

My creative space

Sewing Room (aka badly stitched panorama)
My (clean) creative space

After a fortnight of extremely hot weather my house is a complete mess, so it has been a spring cleaning weekend. My sewing room has been looking extremely messy as I have had a couple of deadlines and haven't been cleaning up after projects.

So since it is so clean at the moment I thought I would take a photo and ask you all... what is your creative space like? Do you have a dedicated room or do you take over the dining room and have to pack up each day?

Now that my room is clean again I am once again resolving to clean up as I go and try and keep it clean. I wonder how long that will last...

I had to take three photos to get in my myriad of desks and this is those photos stitched together giving you an almost 180 degree view. There isn't anything at all in the opposite corner (where I'm standing) because I like the uncluttered room and lots of space. If you click the photo you can have a look at some of the notes on what you're seeing.

Saturday, November 21, 2009

Cats Finished

Cat Quilt complete
Cat Quilt Completed

I expected the quilting to take me a lot longer, but it was over in a couple of sessions. There are a couple of small errors which I think only I will notice, but I am extremely happy with my third quilt.

As with my first quilt, I "stitched in the ditch" and in my first sitting, before I knew it I had 6 blocks complete. Once the blocks were done it was just a matter of persevering with the inner border, then zipping around the outer cream border.

The binding was done over two nights because it was extremely hot and humid here. I used the same colour blue as the background to keep the focus on the centre.

Now it is time to clean up my sewing room and get ready for the next project.

Thursday, November 19, 2009

Quilt Fair Favourites

SA Quilters Logo

I discovered that the SA Quilters Guild website now has some photos of the quilts from the recent Craft Fair, specifically the ones entered to be judged. So I thought I would pick through and show you some of my favourites, or you can browse through them all.

Unfortunately the vast number of beautiful quilts that I admired are not on their website, therefore this is only a small selection of what I picked out to be my favourites.

Tuesday, November 17, 2009

Quilting the Cats

Quilting
Quilting in progress

I was a little afraid to start the quilting on this project and enquired about a professional finish with three long arm quilters. I think I must have had a dream (or nightmare) about the quilting because I have just read through their emails again and I was certain that two of them were against stippling and recommended custom quilting or keeping it simple so that the quilting didn't detract from the design. Only one quilter suggests that an all over design might not be the way to go, but that was enough to plant the seed of doubt... so I have just completed stitching in the ditch.

It was actually quicker than I thought it would be. After quilt number one I expected the quilting to take me at least a month, however I was able to quilt the blocks (except for the very centre) in a continuous line which went a lot quicker. I had to be careful not to run into the cream as I used a navy blue thread. I erred on the side of the blue while keeping the stitching as close to the seam as I could so the quilting is barely noticeable.

Only the binding is left to do now. This is fantastic! I will definately be finished by Christmas.

Friday, November 13, 2009

Search for Backing

Quiltaholics, The Parade Norwood

Day five (or is it six?) of extreme heat hovering around 40°C and I have slowly but surely been working on the cat quilt. Last night I hit up Spotlight for the batting and quilt back, but alas... they were out of blue in the wider width. This morning I ended up having to trapse all over town looking for a backing.

Sue's Sewing World is the only quilting shop I was aware of in my area so I headed there after my local Lincraft also failed to supply quilt backing in the colour I desire. I was amazed to see that the Chocolate Print I purchased at Tricia's was selling for $22/m there. Tricia's definately has some bargains, though Sue's stocks a range of sewing equipment and is a machine service centre as well.

The lovely lady at Sue's Sewing World recommended I try Quiltaholics and gave me fantastic directions. At least I have a car with airconditioning!

Quiltaholics is another store like Tricia's in which you walk in and then don't know where to start looking first. I knew I was there for a purpose and that I couldn't afford to look too much or I would spend too much money so I didn't look at any of the prices. I did notice they had a basket of beautiful William Morris fabrics among other things, so I will have to go back later when I can afford it! The lovely lady helped me to find the quilt backing I wanted and it was only a couple of dollars more expensive than what Spotlight normally stocks, so I was happy with the price. The helpful friendly faces mean I will definately be heading back to this store soon.

I've added both of these stores to the South Australian Map so it will be easy for you to find these places too.

As for the cat quilt, I have added another cream border all the way around with blue borders to finish it off. The top will be approximately 49", which is a little under my initial plan of a 60" square quilt, but meant I could buy a cot sized batting which is 50x60" at only $24.95, which is quite a saving.

Sunday, November 8, 2009

Cat Quilt Update

Cat Quilt
Cat Quilt with applique and border

This project has stagnated because I got it to a point where I was really happy with how it was turning out and was scared to work on the next step incase I did something wrong.

I bit the bullet today and slowly added the next few items. It has been a very hot day so I took a lot of breaks and was able to step back and think a lot about what I was doing.

First I added a 2" border around my centre patchwork. I am aiming to get this to approximately a 50" step. Then when I began procrastinating about adding the next border (incase I make a mistake and ruin my work...) I decided to finally sew my circular centre-piece.

I have also been having a think about how I am going to quilt this monster. I've thought everything from stitch in the ditch to something simple like a square crosshatch, but with the centre circle left unquilted with perhaps just a line 1/4" in from the seam... to even doing some kind of stipple involving cats or paw prints.

I am also thinking about getting this professionally quilted and there was a list of machine quilters in my area on the back of one of the pamphlets I picked up from the Quilters Guilde yesterday. There is one in particular that has a website and did several pieces that I physically saw at the quilt fair, so I am thinking of enquiring into what she would recommend and estimate I would be up around $70-100 for her professional quilting. It would make it a bit more expensive than I would have liked, however it would save me the stress of quilting this before Christmas.

If you are in South Australia, there is a link in the side menu to a map of long arm quilters in our area. Or if you are from other places or know of other quilters I have left it open to collaboration. All you need is a google account and you can add to the map to make it a great reference for everyone. Do you think we should add quilt stores and guilds as well? It can be colour co-ordinated with different labels, so I am thinking it may have potential to be a fantastic reference for stores and services.

Saturday, November 7, 2009

Quilt Fair Reflections

Japanese Fabrics
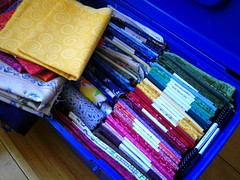
Japanese Fabrics from the Quilt Fair

I ventured out to the Craft Fair in South Australia today and phew.. so many people! I must admit that while the eye candy was everywhere, the prices were a bit of a shock to me. I am usually all for quality over quantity and believe that since time is the most expensive thing to me, there is no point putting in a lot of time into a piece of art or craft if cheap materials will let it down in the end - ie. I don't want to end up thinking : "I spent 50 hours creating this... what I pity I didn't spend the extra $20 instead of buying the cheap stuff."

Quilt fabrics are such an absolute rip off (gets on my soap box)... For a simple pattern in a couple of colours there is no way 90% off the stuff I saw today should have been selling for more than $15-20/m... Most of it was around $7-10 for a FAT QUARTER! And people were paying that!

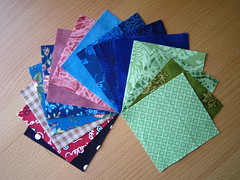
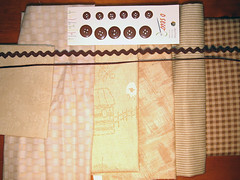
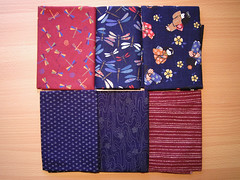
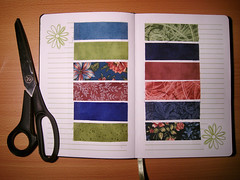
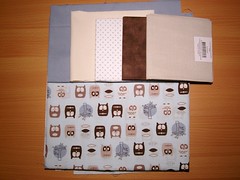
I must admit that I did buy two pieces of material that I thought were a bit rich... The geisha's pictured above were $7.50 for a fat quarter (ie approx $30/m), and the blue dragonflys were $8.70 for 30x110cm (ie approx $30/m). The other 4 fabrics were $3.50 per FQ (ie approx $14/m... much more reasonable!). I did think that since I had spent $20 on parking and entry that I wanted to come away with something.

I took quite a few photos in the display area, however unfortunately there were signs everywhere saying that I was not to publish any of the photos so I can't share my favourites with you. I found it interesting to study a few different pieces and see if I could tell how they were put together. It has given me a heap of ideas, and most of my photos turned out ok so I can remember what I saw. Now my mind is overflowing with possibilities!

I also wanted to find out about quilt shops and groups in my area, however I found that most stall holders were not hugely forthcoming. The Quilters Guild left me with a bit of a bad taste in my mouth after I patiently waited for a lady to finish enthusiastically talking to one lady, who then skipped past me to the lady behind me, and when I tried to ask her a few questions she was quite abrupt. I think a young 20-something is not the kind of clientele they are generally used to.

It wasn't all bad though as I had a lovely chat with one of the staff members in the exhibition hall early on, and I came across a couple of lovely stalls, including the ones that I purchased a few items at, and I will list the links at the end.

So there you have it folks! Three jam packed hours, and then my claustrophobia in crowds got the better of me, but it was a great morning!

Fabrics from Craft Fair
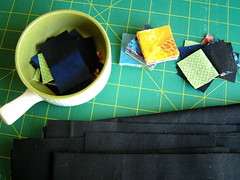
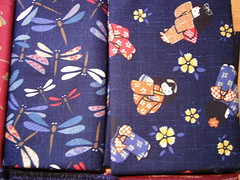
Kimono Girls and Dragonfly

Be Be Bold (NSW) - Specialising in Japanese Imported Fabrics... had a lovely range and I spoke to a very nice man who was very helpful and suggested that if anything isn't on the website to email and see if they have it in stock anyway. I purchased the blue dragonfly fabric from this stall.

Patchwork with Gail B (Vic) - Amazing range of fabrics and they stock over 9000 bolts of fabric most of which is $14/m or less! Lovely stall holders who were very friendly and you can't go past their value for money. I purchased 4 fat quarters from this stall.

Logans Patchwork (NSW) - One of the larger ranges of oriental fabrics that I saw and some lovely packs and patterns. I purchased the geisha fabric from this stall.

Patchwork By Sea (SA) - I was smitten with one of their block of the month quilts, but alas, you couldn't take photos in the stall area. They have it on their website however - Longevity Symbols. It is even more stunning in person and the lady at the stall was very nice. They also had a stunning range of William Morris fabrics which were reasonably priced so I will have to check out their shop one day soon.

The Quilt Basket (SA) - I think this was the one that had heaps of nice panels and the ladies were quite nice. I can't remember why I grabbed their card (I had reasons! lol), but I only grabbed cards from the stalls that made a good impression, so check this one out too!

Tuesday, November 3, 2009

Block Party!

Block Party! Fabrics

This is the first collaborative that has me really excited and inspired to share it with you (and not just because of the awesome prizes which I am sure I won't win anyway...) I have always liked the idea of quilt-a-longs, however never liked the patterns that were being offered, or the format, or any number of things that made me think "maybe it isn't for me".

I don't know why this one is different, but perhaps it is because there are several people I recognise from their blogs participating as authors.

One thing I found with "swapping" (on swap-bot) is that I'm not very good at sharing, so I have always known that I would need to participate in a quilt-a-long by myself. I think it is beacuse I am so much of a perfectionist that I can't bare to part with my own work and I'm scared that what I receive from others may not be to my taste or up to my standards.

This project has the best of both worlds. You can join in to participate in groups of 12 made up of other visitors to the blog and flickr group, or you can go it alone with the block patterns and instructions they will provide quarterly.

I think I will be watching this one and I have added it to my growing list of inspirational blogs. So if I have piqued your interest, why not click on over to Block Party!

Saturday, October 31, 2009

Tricia's Discount Fabrics

Note: I've posted an update on 25th March 2012!

Home Cooking Fabric
Cooking Fabric (click to enlarge!!)

I took a drive to the other side of town today specifically to check out a highly recommended fabric store... and trust me when I say this is not a store you want to visit with an empty wallet!

Trisha's Discount Fabrics is a wall to wall quilters delight, which also caters for dancers and theatre groups. They have the most impressive range of cotton and flannel print sorted by colour for your convenience, and the store owner is absolutely lovely and helpful. Happily they are also moving to a bigger premises just after Christmas, so that will be well worth a look as well.

Their current location (until 26th Dec, 2009) is 23B Furness Ave, Edwardstown in South Australia which is just off South Road near Castle Plaza. The price range of most fabrics were between $12-20/m, but all were high quality quilters cottons including a great range of imported brands. They also had too many fat quarters to count all for $2.50 each.

Chocolate Fabric
Chocolate print (click to enlarge!!)

Their new location is just around the corner which should be open early January and I was told they plan on getting in even more gorgeous fabrics when they're settled into the new store near the end of January. If you are in South Australia you should definately check them out at 11-13 Price St, Melrose Park, South Australia.

Their trading hours are 9am-5pm Monday to Friday, 9am-3pm on Saturday and 11am-2pm on Sunday. Check out their gorgeous range of novelty prints. That is the section where I found the two beautiful examples that I just couldn't leave without.

The Chocolate print above is actually going to be used as the border of a skirt. The blue and green cooking pattern is probably going to turn into something quilted... I got the last of that bolt! I don't think the photos actually do them justice. They are such beautiful fabrics in person!!

Saturday, October 24, 2009

Swatch Book

Swatch Book
Swatch Book

On Thursday I was hunting around Spotlight for one more green fabric that would match my stash scraps for a super cheap project and I was stopped by a lovely lady. She had noticed me holding up my little swatch book to every green I could find and exclaimed "OH! That is such a great idea! Do you mind if I copy it?" We then had a chat about the frustration of matching fabrics.

After my first quilt I had a few small strips and off-cuts left over. The smallest I cut into 3" x 1" rectangle and put aside as a keepsake. The rest I either kept or turned into 3" squares depending on their sizes. Then I grabbed a beautiful journal which had been waiting for the perfect use as it was "too good to use" and had been a gift. Initially my idea was to turn it into a quilt journal with photos and swatches from each quilt, but I found myself taking the thing along to fabric stores and its purpose evolved.

So what I have started to do is every time I use a fabric, I keept a little piece and stick it into my book. Every piece is the same size so it is absolutely beautiful to have a look through the pages as well as a fantastic resource for the fabric store.

The only question in my head is whether I should have set it up by colour, or just stick them in as I get them. I think I will continue sticking them in as I get and use fabrics because of the way fabric trends change and if I write down dates perhaps it will be a great history of quilt fabric that I have used one day too.

As one lady thought it was such a great idea I thought I would share it here incase anyone else can use this too. I know I can never remember the exact tone I am looking for so I don't think I'll be without this when colour matching now.

Tuesday, October 20, 2009

Hexagon Skirt

Moulin Rouge - skirt
Hexagon Patchwork

A blast from the past! I could consider this one of my first attempts at patchwork. It was back in 2004 when I was working on a replica costume from Moulin Rouge when I needed to create this piece for the skirt.

One thing I don't like is the techique of creating hexagons with the seam down the middle. It was surprisingly easy to join each hexagon together side by side. I began in the centre and worked each row outwards but choosing my colours for the entire row and then sewing and pressing.

Hexagons are surprisingly forgiving, and with experience of other designs I would say that you do not need to be as precise as you would with a square design as you do not notice as much if a seam is off by an 8th of an inch.

I would love to work some smaller hexagons just like the beautiful bag from Story Quilt which inspired the background of this blog.

Friday, October 16, 2009

Amazing Art from Story Quilt

Patchwork Bag by Story Quilt

Here is something I have been meaning to get around to sharing. It is no secret that the background to this blog is not from a piece that I stitched myself. It is derived from a hand sewn project by a very talented lady known to the internet as Story Quilt. I have been meaning to mention this for some time and I am happily reminded of her work every time I write in this blog. Please have a look at her amazing artwork. She was one of my main inspirations for wanting to try patchwork and quilting.

Wednesday, October 14, 2009

Binding Clips

Binding
Binding Clips

I remembered that I'd purchased "binding clips" which are basically large hair clips and thought I would try them out. They are a lot easier on the fingers and fabric than pinning the binding. This is one extra tool that I happily saw benefits from and will use again.

Basically after machine sewing one side of the binding. I folded over the edge and used the clip to hold it in place while I hand sewed it to the back.

Friday, October 9, 2009

Baby Boys Quilt

Quilt Front
Quilt Top

Quilt Back
Quilt Back

The owl quilt is finished! And not a moment too soon. Tomorrow it is going to a baby shower to be handed on to its new owner. It is simple square piecing on the front, with a improvised strip on the back and diagonally quilted.

Wednesday, October 7, 2009

Diagonal Quilting

Quilting...
Halfway Through Quilting

I just love these "in progress" photos, and it is also a great excuse to take a quick break from the machine. I am doing a simple diagonal quilt, which apparently isn't as easy as it looks. I am now eye-balling the lines which is accurate enough for my liking.

I started off with the blue painters tape as we had some in the shed left over from renovations and I have read it is a good way to aid sewing nice straight lines. However after laying it out and sticking on a couple of guide lines I was already tired of that method. To be honest I wasn't any more accurate with the tape either.

Have you quilted diagonally across squares like this? How did you obtain nice straight lines?

Friday, October 2, 2009

Cotton Sheeting

Boys Quilt back
Quilt Back

I created a strip out of all the little offcuts that I had left over after creating the front. I had quite few long strips, but nothing that was wide enough to make more squares, so I used some inspiration from Crazy Mom Quilts (Fancy Flea Market back) and created a patchwork of strips and bits.

After the strip was done I realised that the cream fabric I bought was going to be nowhere near enough to do the borders on my cat quilt as well as the backing for this. It is only 110cm wide so it was looking at being an expensive quilt back. I remembered Spotlight has wider fabric for quilt backs in nice colours so I thought I should be able to find something cheaper.

Cotton Sheeting comes in big rolls and is 250cm wide! My local Spotlight sells it for just under $10/m. I bought enough cream to do the back of this quilt and I think I now have enough cream to last a lifetime!

Last night I also ironed and laid everything out then pin basted the entire thing ready for quilting. The ironing was a real pain as the cotton sheeting was so creased. I used a spray bottle of water and a steam iron to try and get those creases out. I don't like using spray starch too much as I am concerned about sensitive skin with new products (mine and the baby who will get this quilt)

Tuesday, September 29, 2009

Owl Quilt Front

Cot Quilt for Baby Boy
Close Up

Here is a quicky I have been working on. I cut out the squares on Saturday and sewed it together on Sunday. There are 120 5" squares making up this cot sized boys quilt top. The large pattern is the gorgeous owls I showed in a previous post. I have a little of that material left over so my friend will be happy as she was hoping to have enough for another small project.

Quilt Top for Baby Boy
Quilt Top

For the back I have started some quick piecing. I made a large interesting strip from all my off cuts and need to get some cream material for the rest of the backing.

Saturday, September 26, 2009

Cutest Baby Boy Fabric

Owl baby quilt
Cot Quilt Fabric Choices

Check out these Hooters! My friend chose these adorable owls to decorate her baby boys room. She has made a simple blanket and painted up some canvases, and has kept some fabric left over for me to make a quilt. I've added a selection of matching colours and am about to embark in an epic sewing streak as I picked up the fabric today and want to have it done in 2 weeks for her baby shower.

It is actually quite hard to match fabric. Most stores seems to get certain lines of fabric which all match together but don't match to anything else. The blues in the owl fabric were extremely hard to match, especially as this is for a boy and fabrics seem to tend towards florals. I've been looking around for a while with a small swatch, but have resigned myself to simple prints and flat colours for this one. If it looks to plain (and I have time) I may do some applique.

Friday, September 25, 2009

Pieces Coming Together

Cat Quilt
Pieces joined together

Well that centre block caused some headaches, but I finally have it all together. I made the mistake first of trying to avoid extra seams and pieced the solid cream block into a square border. It didn't work, but luckily I'd made everything a little bigger meaning that I could cut my mess up and salvage most of it. The extra seams in the corners aren't as bad as I thought they would be. I am quite happy with this overall.

I pieced the centre block (twice) yesterday. The headaches were mainly due to the centre cream block needing to be an inch larger than the small pieced cat blocks in order to take my circular applique. Hence the eventual addition of extra seams in the corner so that everything was pieced in straight lines.

You can see now why I have been busily piecing those cream borders and trying to be as accurate as possible. I am extremely happy with how everything has lined up. This is my second quilt after all and I have never done anything like this before!

The whole lot is around 95cm square at the moment and I am going to add some simple borders around the edge, then it will be ready for quilting. The borders will probably add around another 30cm all the way around giving me roughly a 150cm square, or 59" in the old money.