27/04/2013: Almost May already! This year is going so fast!
02/04/2013: Happy Easter. I hope everyone had a fantastic weekend.
01/01/2013: Happy New Year!!
24/12/2012: Merry Christmas!!
13/11/2012: Getting hand-made presents ready for Christmas!!

Sunday, December 27, 2009

Too Much Stash!

Stash
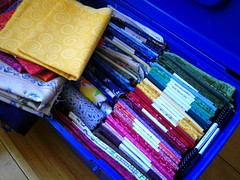
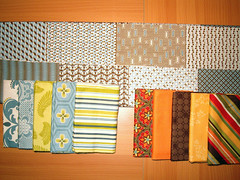
Fat Quarter Collection

Between sales and gifts my stash is starting to get a little crazy so I have been looking for some ideas on what I can do to use up my growing collection of scraps and stash fabrics.

My first thought was a sampler quilt using a different colour for each block, but I began with cream as a base colour and even before my first block was completed, I realised that I am not a cream or light colours kind of person. I couldn't see the block in my house on a quilt I would actually like. So that idea was shelved and I pulled out my black scraps.

Finding inspiration in Red Pepper Quilts I then cut began cutting my 3" square scrap stash into quarters and piecing them with black. The result is a slowly growing collection of what will be 1" splashes of colour.

Scrap Use
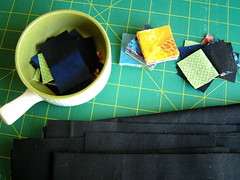
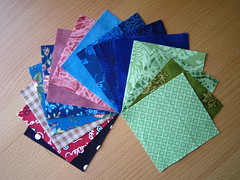
1.5" Coloured Squares

This projects may take a while as I have been sewing a few squares together at a time, and adding to the collection of fabrics as I work on other projects. My hope is that I will use each fabric for only one 3" square, for a total of 4 small 1" colour blocks. I don't know if this counts as a charm quilt, but it is certainly going to be a scrappy quilt.

For stash busting... I am wondering if I should do a colour wheel quilt, or do some crazy quilting blocks in each colour of the rainbow. I need to do something as I'm running out of room for new fabric.

How do you use up stash fabric, especially when you've had a fabric for a little while and it doesn't match any of the new fabric ranges...?

Saturday, December 26, 2009

Tea Set

Tea themed gift set
Coasters, Cozy and Pot Mat

I found this near the back of my Japanese "Patchwoork Classroom" magazine and was delighted to find the pattern was included. The instructions left a little to be desired in comparison to some of my other Japanese magazines, such as "Gosu Rori". There was a lot more writing and not quite as many drawings so a couple of inbetween steps I had to extrapolate from the diagrams and the photo of the final product.

Overall I would say there is just enough in these magazines for an intimediate to expret to construct the projects. You have to know some basic quilting skills and some basic construction techniques because even though they are demonstrated in photos at the beginning of the instructional section, you need to know when to apply them so I wouldn't recommend this for a first project. However if you are fluent in Japanese that may also help your understanding.

Tea themed gift set
Inspired to drink a lot of Oolong tea

My gift arrived at the recipient the day before Christmas - 6 coasters, tea cozy and pot mat all constructed out of the supplies I showed you earlier. The back of the cozy has three applique hearts in different fabrics with the words "tea", "coffee" and "time" embroidered. She nearly didn't get the 6th coaster, because while having every trouble in the world I'd forgotten to sew right sides together when turning something inside out... and had to unpick it after I'd trimmed into the corners. I didn't think I could resurrect the poor thing and was surprised it held together as well as the ones I did right.

If you are looking for the magazine for yourself, try a search for パッチワーク 教室 No.71 on ebay (you may need to install Japanese characters on your computer) I am a huge fan of the Japanese magazines because they contain so many more projects than English language ones and the instructions have a lot more pictres.

Wednesday, December 23, 2009

Chicken Purse

Chicken Bag
Chicken Purse

I found this adorable bag pattern online and had to have one to go with my love of chickens. It cost me $2.60 to make after buying a zip and going through my stash.

If you would like to make your own chicken, I found the pattern at whipup.net. It is a scan from a Japanese magazine, so you may have to redraw a pattern a couple of times until you get it the right size and there are no English instructions.

So that there are no unfinished seams inside the bag I made mine in a particular way, so it took me yesterday and today to complete this project.

To attach the zip I attached fabric to either side of the zip as you would a quilt binding. Then I made a tube of fabric, folded in one end and pushed the end of the zip into it, stitching it in place. I then stitched each side of my fabric tube and zip to a pre-prepared chicken body and once I had both sides sewn on bar 1cm I did the same treatment to the other side of the zip so that it is fully enclosed.

For the other parts the pictures should be enough to get you by, however I changed the wings and made them into little pockets. My bag turned out slightly bigger than the instructions at 11cm x 9cm which I put down to having to get a 12cm zip and size accordingly instead of the 9cm one recommended.

Chicken Bag
Better view of zip

If you make a chicken pouch come back and show me!!

Saturday, December 19, 2009

Piecing Triangles

Triangles!
Triangle Experiment

I've seen the beautiful triangle quilts with hundreds of little triangles joined together and arranged by colour to create beautiful patterns. This is my experiment piece. It is harder than it looks!

To create this square I started with a small pile of 3" squares cut from scraps of various projects. I paired each blue square with a green square and drew a guide line along the diagonal. Then I stitched 1/4" either side of the line, cut down the line and pressed each square open.

The difficult part I found is that the squares had to be SO ACCURATE! Otherwise the pattern made from the colours doesn't line up properly. I absolutely love how it turns out though, so I think that once I have had a little more practice with piecing I will give this another go and try a larger project. I have a vision of a lot of bright colours pieced together to form squares like this to use up all the little scraps I'm saving up.

Beautiful Triangles by Red Pepper Quilts
Yeah! This is what we can aim for :D

Monday, December 14, 2009

Together At Last

Space Invader Army
Army of Invaders

I must admit I am really happy with the bright colours and how this has gone together. All of the pieces are complete, including a laser bullet being shot from the tank. The colours are bright and cheery and beautifully contrasting with the black.

It is quilting time! I'm not quite sure what I should do for quilting, but perhaps I should experiment with some free motion on this one. It isn't very wide at only 26"x70" so it should be easier to manipulate than a full blown quilt, but I will have to practice first.

How would you quilt something like this?

Sunday, December 13, 2009

Offsetting the Invader Blocks

Offset Invader
Angled block

Cross fingers and cut... it worked! Do you ever quilt like that?

I am proud of being self taught in all aspects of my sewing. I paid very little attention to my year 9 sewing teacher and hated anything to do with getting behind a machine back then. None of my pieces turned out right and it was just plain frustrating. However once the inspiration struck me in my early 20s I was determined to make whatever it was I set my mind to.

Todays challenge has been taking my Space Invader blocks and making them angled. I added a 2.5" border to the block, then lined it up on my cutting board and recut it into a rectangle. I don't know that this is the best way to do this, but it worked.

I've also made the tank, which was a very easy block.

Space Invaders Tank
Reporting for battle, Sir!

Saturday, December 12, 2009

Space Invader Orange

Space Invader #3
Third Space Invader touches down

Here we are with space invader number three. This is the third and last invader which has been constructed for my wall hanging. Next in the project is construction of the tank and a laser bullet.

In my opinion, the piecing was a little more complex on this one, which surprised me, however I am especially happy with the bottom of this pattern.

Friday, December 11, 2009

Winners...

And the winners are...

I think I may have caused some confusion in the wording of when entries closed. I have learnt for next time, and will include all entries in the draw. I've gone over to random.org and had the website select me 2 lucky winners.

The winners are:

Entry 4: Carin
Carin said: My favorite block is anything that doesn't have y seams or to many triangles. LOL :O)

Entry 13: free indeed
free indeed said: First choice is #1 but will be happy with #2 if drawn second. Favorite blocks I think would be string blocks right now...using up all the edges of my fabrics. I also am into selvedges lately too :) Just love to be FRUGAL I guess!

I'll attempt to contact you via your profiles to let you know you've won.

It was interesting hearing about everyones favourite blocks. I had to look a couple up which I hadn't heard of before. Most people seem to have a lot of love for pinwheels at the moment, and a lot of people are in to using every last scrap of fabric.

I also want to thank everyone for stopping by and leaving a message. I really enjoyed hearing everyones comments. Thankyou!

Monday, December 7, 2009

Space Invader Blue

Space Invader #2
Second Invader Arrives

The second design following the space invader theme has been constructed. I used a quick piecing method again by formulating a plan, cutting out all the squares and rectangles and then building larger blocks which finally joined together to make the complete piece.

I have been asked for a pattern, so I will work on one and hopefully have something ready to give out in the next month or so.

Saturday, December 5, 2009

Christmas Giveaway

Giveaway!
Giveaway Prize One

As a giveaway leading up to Christmas I would like to add to your stash. I've never done a giveaway before, so I hope that this is good for my first one!

For first prize option I have two Fat Quarters of the same material I used on this project. You'll get 1 fat quarter of red material with a black and white sewing theme pattern and 1 fat quarter of black and white spots. Add black and you should have plenty of material to create your own sewing kit, or use it for your own projects. You'll also get Country Patchwork & Craft Vol 6 No 1, which has a pattern sheet still attached. There are lots of great projects in this one, but I ended up with two copies somehow. This magazine is brand new.

Giveaway!
Giveaway Prize Two

A second prize option is a selection of 15 3" charm squares with no duplicates.

To enter, leave a comment below and to make it interesting please tell me what your favourite type of quilt block is. If you have a prize preference leave it in the comments, and first person drawn will receive their first pick.

I'll be drawing the winner on Friday to allow 2 weeks before Christmas for delivery so please leave a comment by 11.59pm on the 10th Dec. (when is that in your country)


UPDATE: ENTRYS NOW CLOSED

Sewing Kit

Sewing Set
Sewing Kit

This is something I made several months ago as a gift for a dear friend. I found it in my flickr gallery and thought it was about time I posted about it.

I created the bag from scratch with my own made up pattern. The base is the size of a CD and actually has a CD between the fabric for stability as a solid bottom. However I found an extremely similar pattern for you with the only difference being the way the handles were attached.

The other opjects pictured are a small notebook with embroidered monogram, pincushion, needlebook and accessory or thimble keeper. I also made a covered tape measure which is not pictured. All the items fit neatly into the bag which also has some pockets inside to stay organised. I especially loved the little red embroidery scissors and was tempted to keep them for myself.

Friday, December 4, 2009

Stash Building

Stash Building
Stash Additions!!

40% off anything, including sale items? How can I say no to that? Well my bank account tried to scream no, but I didn't listen.

I bought some more batting, which was an additional 20% off as well as selecting some fabrics. These are just my favourites of what I purchased. There is a set of five aqua and lime green FQ, and a set of 5 orange and brown FQ as well as a metre of blue and brown which has 8 different printed patterns. They're not all the same width which is a little disappointing, but I can see some potential and hope I bought enough for whatever this eventually becomes.

The Fat Quarters worked out to a little under $2.50ea for that gorgeous fabric so I can't complain about that!! The orange and brown set is my favourite at the moment. Now I need an appropriate project to show them off. Any ideas?

I've made some progress on a project from Patchwork Classroom magazine. Stay tuned for an update in the next week or two.