27/04/2013: Almost May already! This year is going so fast!
02/04/2013: Happy Easter. I hope everyone had a fantastic weekend.
01/01/2013: Happy New Year!!
24/12/2012: Merry Christmas!!
13/11/2012: Getting hand-made presents ready for Christmas!!

Friday, July 23, 2010

Steampunk Inspired

Steampunk inspired bag
Steampunk Inspired Design

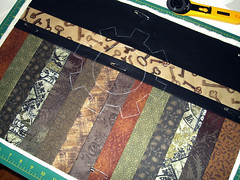
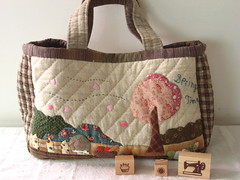
I want a little bag to take a sketchbook with me and since I have been very inspired by a lot of old fashioned ideas recently I used a little of some fabrics I've been hoarding to put together a little bag. I've just started quilting it - I'm drawing out my design as I go using two paper template and a tailors chalk pencil, then stitching around the design on my machine. Perhaps I should have hand stitched it to make it look more rustic... It will be subtle, but hopefully an interesting touch to those who notice.

Would anyone be interested in some step by step's once it is done, including how to make a symetrical machine cog pattern very easily?

Has anyone got any advice to share on my reverse applique thoughts? Have you done any of these techniques?

Monday, July 19, 2010

Reverse Applique Thoughts

Quilting a Rainbow
Rainbow Quilt

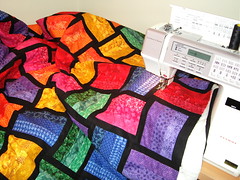
I've been quiet, but sewing has been happening. The rainbow is ready for binding and I've completed another small project too. More on that another time.

I'd love to know if any of you have tried any of the stained glass techniques. I've been doing some research into these techniques and I'm eagerly awaiting the arrival of Reverse Applique from Book Depository. I've also browsed the internet and youtube for tips and tricks and I've found there are three different techniques that can be used.

1. Use fusible bias tape to divide the coloured areas. This technique can leave visible stitching depending on how you sew down the bias tape.

2. Place black fabric over the coloured areas, then clip and hand sew to leave the outline you desire. This technique uses a lot of basting, but leaves no visible stitching.

3. A relatively new technique where the black fabric is covered with a fusible interfacing such as vlisoflex. Areas are then cut out and filled with colour leaving a black border which is then sewn with a narrow zigzag. (see a video tutorial)

My question is... have you completed or seen any of these techniques? Which did you prefer?

I think the pattern I am currently designing is too complex for the bias tape method as I have areas which become wider than 1/4". I am unsure whether I should spend the time and use the second technique so that the quilting will be the only visible stitching, or whether I should just go for simplicity and do point 3 which I think would be a lot quicker. What do you think?

Sunday, March 28, 2010

Patchwork Baskets

Patchwork Fabric Basket
Patchwork Baskets

Another "in a day" project as I have been so uninspired and really need to get on with the quilt along. If only there were more hours for sleep this week!

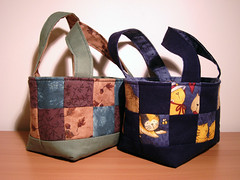
With Easter coming up I made a last minute decision to whip up some gifts to go with the chocolate. I was inspired by a photo on flickr and then hunted around to find a bag tutorial. This pattern matched the idea I had in my head perfectly!

The instructions are very easy to follow and I whipped up the green bag in a couple of hours as a tester. Then I fussy cut cats from Debbi Mumm fabric I had in my stash and made up the blue cat bag which will go to my Nanna filled with easter goodies.

Saturday, March 20, 2010

Small Purse

Patchwork - Green Kitchen Memories
Quilted Kitchen Memories

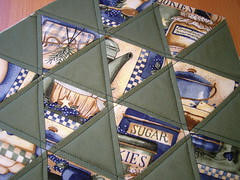
Remember this fabric which I bought last october? I trimmed off a crooked edge today and fussy cut some triangles to work on a small project. I'm hoping this will help bring my mojo back!!

It has been so hectic around here that I haven't been doing any sewing. I have a tonne of things I want to get to and no energy. I can now tell you all that I am starting a new job on Monday, so the last 2-3 weeks have been a whirlwind of interviews, filling out forms, meeting new people and finishing up at my last job. I had been at my previous job for 8 years, so I must say I am a little nervous about the change, but I know it is the right thing for me right now.

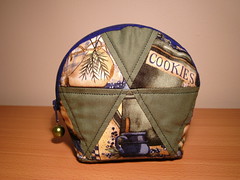
Little Bag/Purse
Finished Purse or Bag

I tried out several new things with this little project. First was the fussy cutting. I made a template for an equilateral triangle out of thick clear plastic - you can use the 60° line on a quilting ruler to draw your triangle! I found that if I was careful I could use my plastic template with my rotary cutter, so it didn't take too long to have quite a few triangles cut out. The clear plastic made fussy cutting a breeze. I marked my 1/4" seam allowance on the plastic and then just lined up the image and cut.

After piecing my triangles together I decided to use another new toy - Quilt Basting Spray. It is a dream to work with and held everything together without any pinning while I quilted. Next I made up my bag using instructions from Quiltsalott. My bag is a little smaller as I made my pattern just under 6" so that it fit on an A4 piece of paper. I adjusted her measurements by dividing by her width of 8" then multiplying by my width in all cases which kept the ratios the same.

I've always wanted to have a go at a bag like this, and this one is really easy. The finish is beautiful with no raw edges anywhere, although finishing the zip and the inner corners was a little fiddly. I photographed the back view as well, where you can see I reversed the direction of the triangles so that both sides would feature the kitchen fabric right way up.

Sunday, February 28, 2010

Oh Dear!

Grout and 2 coats of paint
My most recent project

Firstly my sincerest apologies to those waiting patiently for the next installment of the quilt along. I just wanted to check in and say... I'm still alive and have been thinking about you all!

I've been spending daylight hours working on renovations which are taking longer than expected and between that and work I have been so very tired. I don't even know what happened to the last week. It was over far too quickly! I hope to get back on track this week, however please take this opportunity to catch up if you need to.

Monday, February 15, 2010

Rotary Blades


Rotary Cutter Blade

I know when I first used my rotary cutter I fell in love with how easy they are to use and how quick they make cutting your pieces. I have a 45mm standard Olfa rotary cutter and earlier this year I realised how dull my blade had become. I don't know what it is like in other countries, but here in Australia it cost me $10 to purchase one replacement blade.

Imagine my surprise when I discovered a pack of 5 on ebay for barely more than I spent on one!! I knew I had to see if the seller was up to scratch.

Well if you use a rotary blade, Birdbrain Collectibles and Scrapbooking is a seller you should add to your bookmarks! I ended up buying a couple of things from her as she responded to my questions within the hour. Generally I am happy if I get a reply by the next day, so I was astounded by her prompt and polite service. My package of goodies arrived in a timely manner. I purchased a pack of 5 rotary blades which should last me a while yet.

She informed me she doesn't carry all stock all the time, however she does seem to have a regular supply of rotary blades in her store so I am sure she will keep getting them in if people keep buying them.

She sells in packs of 5, 10 or 15 and between her prices and her amazing service I am sure you will be pleased.

Wednesday, February 10, 2010

New Toy - 1/4" Foot

Sewing Machine Feet
Sewing Machine Feet

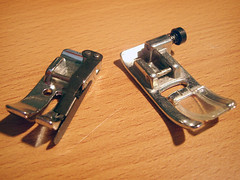
I have a new toy to play with! I am saving it until after I've finished my current projects though so it can have a fresh start. The foot on the right is the one I normally use. It has a centre guide line and a line that is good enough for a 1/4" however it is not always perfect... I am getting better though.

The foot on the left is a specially designed 1/4" foot for my Janome. I bought it on ebay because (unfortunately) it was half the price of the ones I could get from my local store. The black guide bar on the right of the foot allows the fabric to be guided through easily and on my test piece I had a perfect 1/4" seam over a 5" length! I didn't even have to think about guiding the fabric accurately.

I'm sure this foot is going to make things easier. Perhaps I should just start using it straight away, although I have it in my head that if I do that now my current quilts will end up with an obvious difference in them - a perfect half and a not so perfect half. I am probably just being silly though!

Monday, February 8, 2010

Piecing Perfect Corners

Perfect Corners 1
Stitch and Press

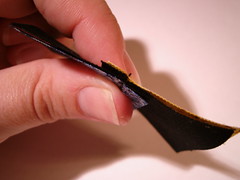
Being self-taught, I have experimented with different pressing and joining techniques. While I prefer pressing seams open as I feel it gives a flatter result, there are times when pressing to one side helps you to obtain a perfect corner. This is one of those times and we can use this technique in this weeks blocks.

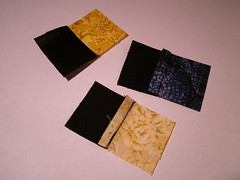
I'm joining my 1.5" squares together, so first I join a black to a colour with a 1/4" seam. You can use the chain piecing method to make this go faster if you like. Next I press the seams towards the black with my iron.

Perfect Corners 2
Line up the Seams

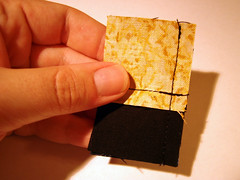
Now we need to line up our centre corners. When you take your two pieces and put them together you will notice that the seams are facing opposite directions. When the corner is lined up correctly you will feel that they seem like the pieces are interlocked. Initially I found it helped to pin at this point and I still do pin when sewing a larger project - for example I used this method to line up the rows from my rainbow basket weave quilt. With something as small as this I find pinning unnecessary.

Perfect Corners 3
Stitch...

Of course we're using a 1/4" seam to join these blocks together as well. Don't be afraid to unpick your stitching and have another go if you are not happy with the results.

Perfect Corners 4
Open up and Check

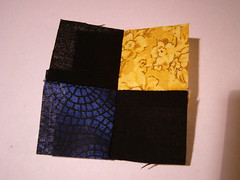
Have a look at your work! If you are happy with it, press the seams open. You can see that the corners have lined up perfectly. Enlarge the photo and have a close look if you like.

I hope this helps you with your piecing. Time for me to get on with my other blocks from this week...

Sunday, February 7, 2010

Using Every Scrap

Using every scrap
Cutting Scraps

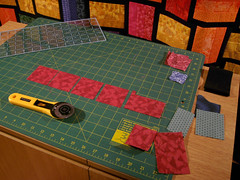
Because my fabric is very limited for the Raid Your Stash quilt along I am trying to be as frugal as possible. I want to try and have some fabric from each colour left over so I am trying not to waste any fabric at all and throwing out only the most minute scraps.

The smallest unit we've been using is a 1.5" square so any piece larger than this is saved and set aside. We've usually been using sizes in combinations from 1.5" up to 3" so as I cut my pieces I try to mix these up. For example, a 3" cut in half will give us 1.5" blocks. A 2.5" strip can be set aside to use later when more 2.5" sections are needed, etc.

Before cutting I spread out my fat quarter and think about the best way to cut the least amount of fabric to get the pieces I need for the next block. I also mix up the colours according to the amount of fabric I need. Some blocks only need a small amount of fabric from one colour and more from another, so I ration out the fabric according to how much I have left instead of choosing the colours I want to go together. This is giving my some interesting colours I may not have otherwise picked.

Are you quiltig along with me? How are you rationing your fabric?
Do you ration fabric like this with other projects and try to use every little scrap?

Oh! In the background there you can see the rainbow basket weave quilt top. It is finally together and hanging on my curtain rail ready to be quilted. I am extremely happy with it and must have learnt something lately because all my corners line up perfectly. I think it is the best quilt top I've made yet!

Sunday, January 24, 2010

More Fabric!

Fabric Haul
Inspired by Tarnished Metal

I headed out to Tricia's Discount Fabrics yesterday with two aims - to show a good friend a fantastic fabric store, and to increase my stash.

I have a specific purpose in mind for this fabric, however I am still working on my patterns at the moment. It may be some time before I can show off what I will eventually make with this lot, but I am very excited about it.

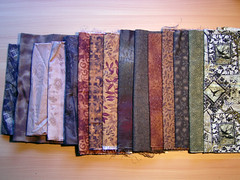
The 5 fabrics on the left are a little scrunched as they were pre-cut fat quarters and need an iron. The rest I bought 1/4 metre of each. At the far right is a stunning fabric from what I believe may be a new line: "Floragraphix III Swallow Clock In The Beginning Fabric".

The discovery of that last fabric made me rethink some of my choices and add in a green. Finding "tarnished" greens is quite difficult though.

I'm excited! I hope you'll stay in touch to find out what I'll be making from this selection over the next few months or possibly over the rest of this year. As always, click on the photo for a larger view.

Sunday, January 17, 2010

Patchwork Classroom #71

パッチワーク 教室 No.71

Here is a closer look at one of my Japanese Mooks*. This is Patchwork Classroom Volume 71 which contained the beautiful Tea Set which I made in December last year.

Japanese Craft/Sewing mooks all tend to follow a similar format from my experience. The front half contains beautiful photographic images of all the projects with short descriptions (in Japanese) and a page number to the back section. This makes for a beautiful contrast to Australian magazines which tend to follow each project with the instructions. The Japanese magazines are more elegantly designed for browsing and admiring the projects within.

Inside the Magazine

The second half of the magazine contains the instructions for all the projects in sepia or black and white. There is also a lift out pattern sheet. This magazine is 114 pages with approximately 70 dedicated to project photos and advertising and 45 pages of project instructions. I counted 48 different projects and there is a heavy focus on bags and purses throughout this issue (approx 2/3) with only a few wall hangings and zakka** projects included.

The reason I chose this book is primarily because of its focus on bags. There is a treasure trove of bag designs within the magazine and a few of the styles show what the same bag would look like if you complete the patchwork, or the colours, or the quilting in a different way. This really helps you see the potential for customisation of the projects.

A point to remember is that these projects are usually designed for hand piecing and hand quilting and so the instructions are based around particular hand sewing techniques, however I don't see anything stopping you from using your preferred techniques with their patterns.

Example of Instructions Provided

If you are interested in Japanese magazines, but do not understand the language then you need not fear. Page numbers and measurements are all in standard western numerals while the instructions contain much more detailed diagrams than you would find in western craft magazines. If you take some time to explore your mook you will soon learn where to find the page reference for the instructions and how to skim through the written instructions and match characters to understand your fabric requirements and notions. I would recommend these magazines to intermediate quilters or sewers to avoid frustration unless you are fluent in Japanese.

Are you interested in this exact magazine. Buy it now on ebay. (I have bought from and recommend this seller, but I am not affiliated with them in any way)

* Mook - A hybrid between magazine and book.
** Zakka - Handmade household goods such as tableware or soft furnishings usually also charming or cute. This tea set would be considered "zakka".

Monday, January 11, 2010

Basket Weave Rainbow

Basket Weave
Basket Weave Rainbow

It has taken me longer than I expected to create these blocks, though I guess it has really only been a 4 day project so far. These blocks are a little tedious to make and we are currently in the middle of a heat wave which has made some of the processes (ironing) less than appealling.

I cut 2" strips from my fat quarters and then pieced them together, which were then cut into three blocks each. I had previously cut into some of my fabric so for the purple in particular I had to be creative with my cutting to get out the maximum number of blocks.

I now have between 18 and 24 of each colour, however I need a large area to place them out. I currently have a sick hen taking up my spare corner in my sewing room. Hopefully she can go back out when the cool change hits and then I can spread out on the floor because the kitchen table isn't big enough.

Sunday, January 10, 2010

Bee in my Bonnet

Paper Doll Applique by Bee in my Bonnet

Isn't this a gorgeous and unique idea. This is just a small part of one of Lori's designs which I wanted to share with you. Please have patience while her site loads as it is worth it! It has so many beautiful images and step by step pictures to create all the elements in Lori's absolutely stunning paper doll blocks. There are so many details and with each of those tiny elements it looks like another great way to use up your scraps. Now no scrap of fabric will be too small to save!

Looking further through her blog I don't know if the paper dolls are available as a pattern yet though perhaps she would welcome an email enquiry if you are interested. She has all her available patterns at this link.

I think what I like about these patterns is that they remind me of the whimsical style many Japanese/Asian textile artists use in their creations and the style inspires me, just like I have found so much inspiration from Story Quilt.

Casual bag
A Patchwork Bag by Story Quilt

Friday, January 8, 2010

Basket Weave

Rainbow of Fabrics
Rainbow of Fabrics

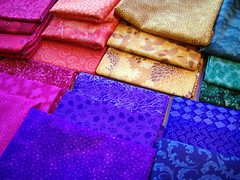
Last week I mentioned that I had been sorting through my stash fabric and found a set of fat quarters in bold bright colours. Yesterday I went to Tricia's Discount Fabrics new store (11-13 Price St, Edwardstown, South Australia) and bought an extra fabric in each colour so that I have three of each of the bold fabrics. Chain stores like Spotlight have really terrible colour ranges at the moment so I had no choice but to go to Tricia's, and I am glad I did as it is at least 4 times the size and still wall to wall fabric. She will soon have a whole room for fat quarters as well as a class room and a chatting room as well! What a store!

Now that I have enough fabric I have started working on another project which I will be doing inbetween the Quilt Along. I am using a strip piecing method to create 6.5" basket weave blocks.

Basket Weave Blocks
Yellow Basket Weave Blocks

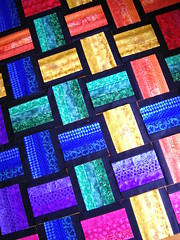
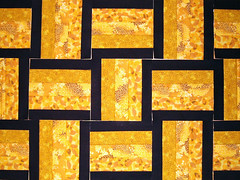
You can see I've started on yellow. First I cut each of my fat quarters into 2" strips and pieced them together with black on either side. After ironing the seams open I cut and trimmed them into 6.5" blocks. After trimming I had a thinner black strip than the coloured strips which I think will work very well into setting off the basket weave design while allowing the colours to dominate.

At first I cut my strips 7" wide because I had 21" to work with. Once I attempted to place out my first three blocks I quickly saw that the key to this design is that you must have square blocks. The design contains the same block over and over either straight or turned 90 degrees so you must have a square.

You can see how the basket weave will come together in the photo, however I plan to work the other colours into the design as well. It is such a simple design and easy block, but I know it will look great as you can see from my inspiration.

Thursday, January 7, 2010

Bicycle Clips and Stippling

Quilting Setup
Quilting Setup for Invaders project

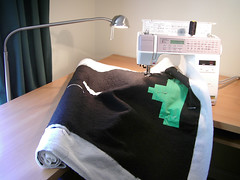
I thought I would show you my setup for quilting the invaders. You can see that I have a nice clean desk which is a corner style. This gives me plenty of support on the left hand side of my machine when I'm quilting and I can move my machine around to the best position. I also have a fantastic light with two brightness settings and two articulation points so that I can see what I am doing from any direction.

For a lot of this project I had my machine closer to the corner where I could get the whole width of the quilt spread flat. I also found that pushing the machine back away from me gave me space at the front of the machine to support the fabric there. You want a lot of support when trying to stipple because you don't want to fight with the weight of the quilt. For example, if it hangs off the edge of the table you will have extra weight pulling against you as you try to ease the fabric back and forth under the needle.

You can also see in this photo that I found a use for the bicycle clips which I purchased when quilting my first quilt and found too awkward to use at that point. They really helped this time to keep one side wound up and secure so that it didn't fall off the edge of my table. They work best when they are tight around the fabric and I used three along one side to keep it secure and out of my way.

The quilting is finally completed and I count this a great success for my first attempt at stippling. Of course there are a lot of teething problems but I allowed myself to have a go and to make mistakes so that I could learn. Do have a browse through all the free motion designs and instructional videos by Leah Day as they are such a great help for a beginner and I am sure anyone could get something out of her fantastic blog.