27/04/2013: Almost May already! This year is going so fast!
02/04/2013: Happy Easter. I hope everyone had a fantastic weekend.
01/01/2013: Happy New Year!!
24/12/2012: Merry Christmas!!
13/11/2012: Getting hand-made presents ready for Christmas!!

Wednesday, October 24, 2012

Band Sampler Continued


I'm still filling this little band, but it is almost done. I've used so many stitches now that I can't remember all of them, but one of my new favourites is that top left flower which I think is oyster stitch - it is like a double chain stitch which is linked together.

It is taking me a little longer than I expected but it is so relaxing to just pick it up and fill in a gap here or there with whatever takes my fancy. Aside from this blog post, tonight I'm heading to bed early to read my book as I'm onto the fourth and last in the series and it is finally getting tense and exciting. If anyone is on the site goodreads.com feel free to add me there!

I spent a fair bit of my Sunday redesigning this blog as I wanted to get the lightbox working, which is a relatively new feature of blogger that didn't work on my old custom designed blog. Being a web designer means I'm never happy with my blogs and websites so I'm always tinkering, but sometimes that means that an estimated hour or so fixing something turns into a full day redesigning. At least that means you can click on the pictures and they open up in the same view without losing the page you are browsing on. Mission accomplished!

I also need to be banned from ebay!! I bought another patchwork book. I can't remember if it is Korean or Japanese, hopefully Japanese so I can read a little of it, but either way the picture directions are usually very thorough and it has lots of nice projects. I'll share it with you as soon as it arrives, but I nearly bought several more and I really can't afford to so I will have to ban myself for a little while. The projects are so beautiful though and inspire me much more than Australian or American quilting. I see a patchwork bag for myself in my future!

Saturday, October 20, 2012

Doodling with Thread


Mini Update: A couple of evenings just playing around with thread and I've covered almost half of my band. I think I've used backstitch, chain stitch, detached chain, pistol stitch, french knots, bullion knots and fly stitch... can you see any I forgot to mention?

I'm not using a pattern for this. I'm just adding whatever I feel like and swapping colours as I go. I'm itching to show you what this is going to turn into so I'm going to keep stitching!!

And a big hello to anyone who has joined me from over at Nina's blog!

Thursday, October 18, 2012

Embroidering Doodles


Nyan cat is taking a little rest while I wait for the postman to deliver a special addition for it. I am a little impatient to get it finished, but in the meantime I am making a start on something else...

This is a little bit of embroidery. It is only 2" wide and at the moment I dont' have much of a plan. I stared with a couple of drawings but then changed my mind and just started stitching. I'm not entirely sure where this stitching is going except that it is going to be a great "you design it" e-textile pattern. You'll add your own ideas to the embroidered part then take my instructions for adding three LEDs to the design. It will hopefully be a great way to take the plunge with conductive thread without breaking the bank.

So I'm not worrying too much about wonky lines and while I'm mostly using backstitch I've also thrown in some detached chain and french knots so far. I'm sticking to three colours and I've marked where I want to put the LEDs, but after that anything goes! It is like doodling with a pen, but with thread instead.

Monday, October 15, 2012

Nyan Style


Nyan cat is remade and has a rainbow base ready for the next step. The cat takes about 2-3 hours to make. Those little feet and tail take almost an hour by themselves because of the small size. Tweezers are the only way I could get them turned after stitching.

The rainbow wrist cuff base is fairly simple. There are 5 colours pieced like a patchwork quilt with a 1/4" seam. I originally had yellow as well, but decided the tone I have didn't fit with the other colours so I left it out and I like the end result anyway. The ruffle bottom is something I learnt how to do from a Japanese homemade fashion magazine. I'll be explaining how to do it in the pattern if you want to make this yourself and add the ruffle. I wanted the ruffle to add more area to the design without taking up more wrist space as it is already 2" wide.

So it is almost done... but there is one thing more to add and I have something special on order which may not get here until 2 weeks time!!

Sunday, October 14, 2012

Miniature Sewing


It was funny to get a comment that the frog should be smaller as I was working on something very tiny at that point. I have been debating whether or not to show this one now or wait until it is finnished, however I made a colour choice mistake and need to make this little guy all over again. This little nyan cat isn't going to go to waste though. I'll think of something for him.

A nyan cat is the combination of a cat and a poptart. Don't ask me why... it is quite popular among internet memes and usually has a rainbow coming out of its butt. Wait and see what the final plan is for this little guy... after I remake him with a better body colour.

You can see how tiny it is. The feet were particularly difficult and I used tweezers to turn them after machine sewing. I'm planning a pattern for him soon so keep an eye out on Happy Bobbin if you're interested.

Saturday, October 13, 2012

Frog Finished


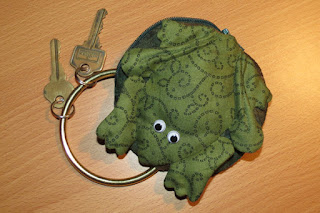
So here is a little frog with pins sticking out of him everywhere, holding him to the lilypad. He looks a little shocked... perhaps because of the location of some of the pins! He's been a little more effort that I originally expected, but really only took me about 3-4 evenings worth of stitching... what do you think? Is this something you would like to see as a pattern?

And here he is finished...


This is the back of the little purse and you can see the quilting stands out a lot more now. It is designed as a key holder, or key purse. The large ring has some small keyrings attached for keys and then you can either put a little bit of change inside the purse, or even slip the keys inside to keep them safe.

The body of the frog is stitched to the top of the lilypad, but his front feet are not stitched down and his back legs are pushed in so they are 3D and stitched only along the feet.

Friday, October 12, 2012

Frog progress


I'm working on putting together the lilypad now while I think on this frog. It was harder to put together than expected again, with a bit of hand sewing. I constructed the feet seperately via machine which worked really well, but then was short circuited on how to put it together with the body and ended up hand sewing the feet to the body pieces. I'm not 100% sure how this will turn out and might have a bit more of a play around with the construction. Any ideas?

The lilypad got a dose of machine quilting and I'm a lot happier with it, but still have to try machine sewing the whole lot. I'm currently putting in a zip by hand which I think will give a better finish than if I'd machine stitched it. Actually, I already put it in once, but got it thr wrong way around so all of last nights stitching was undone... It is half way in again. I'd better get back to it!

Saturday, October 6, 2012

Lilypads


This is the start of a new project which is hopefully going to turn out nice enough to be a present. If it turns out well it will also be a pattern for the Happy Bobbin shop too.

So far we have two lilypads and a foot. I bet you can guess where this is going. I had to hand sew the lilypads as the machine really didn't work out for them, but maybe I was too impatient with trying to stuff it with the batting. Instead I slowly worked my way around, folding over both sides of the fabric with the batting inside and hand sewing the edge.

The foot worked well with the machine and I put the batting in with a pair of tweezers. I might have to give those lilypads another go on the machine just to see if it could have been done...

The lilypad with the paisly pattern showing has some light quilting as veins on the leaf. I don't think I'm going to worry about the other as it will be covered by a little frog, but we'll see. That's all for the preview for now. I finally remembered to give you all a little progress shot of what I'm working on for a change!!

Friday, October 5, 2012

Rudolph has a Red Nose


I have this little guy all ready for Christmas. I created my own plush pattern from a mash up of a couple of different patterns I found online - simplified, added hooves, made up the ears... all sorts of changes that make it uniquely my own and I had a lot of fun doing it.

The head is version three. I had lots of issues getting the proportions right, but thankfully I only had to do those antlers once as they required a lot of patience to turn them right way around. I was really happy that the body looked so great first time.

Of course, nothing is complete lately without at least one LED light, so little Rudolph's nose really lights up red when you turn on a switch hidden underneath his collar.